Category: Technical SEO

  • What Is Schema Markup and How Do You Implement It? (2026 Guide)

    What Is Schema Markup and How Do You Implement It? (2026 Guide)

    What Is Schema Markup_


    Search engines are smart, but they still guess a lot. They read your page and try to work out what each detail means. Is that number a price, a phone number, or a rating? Is that name an author, a brand, or a product?

    Schema markup removes the guesswork.

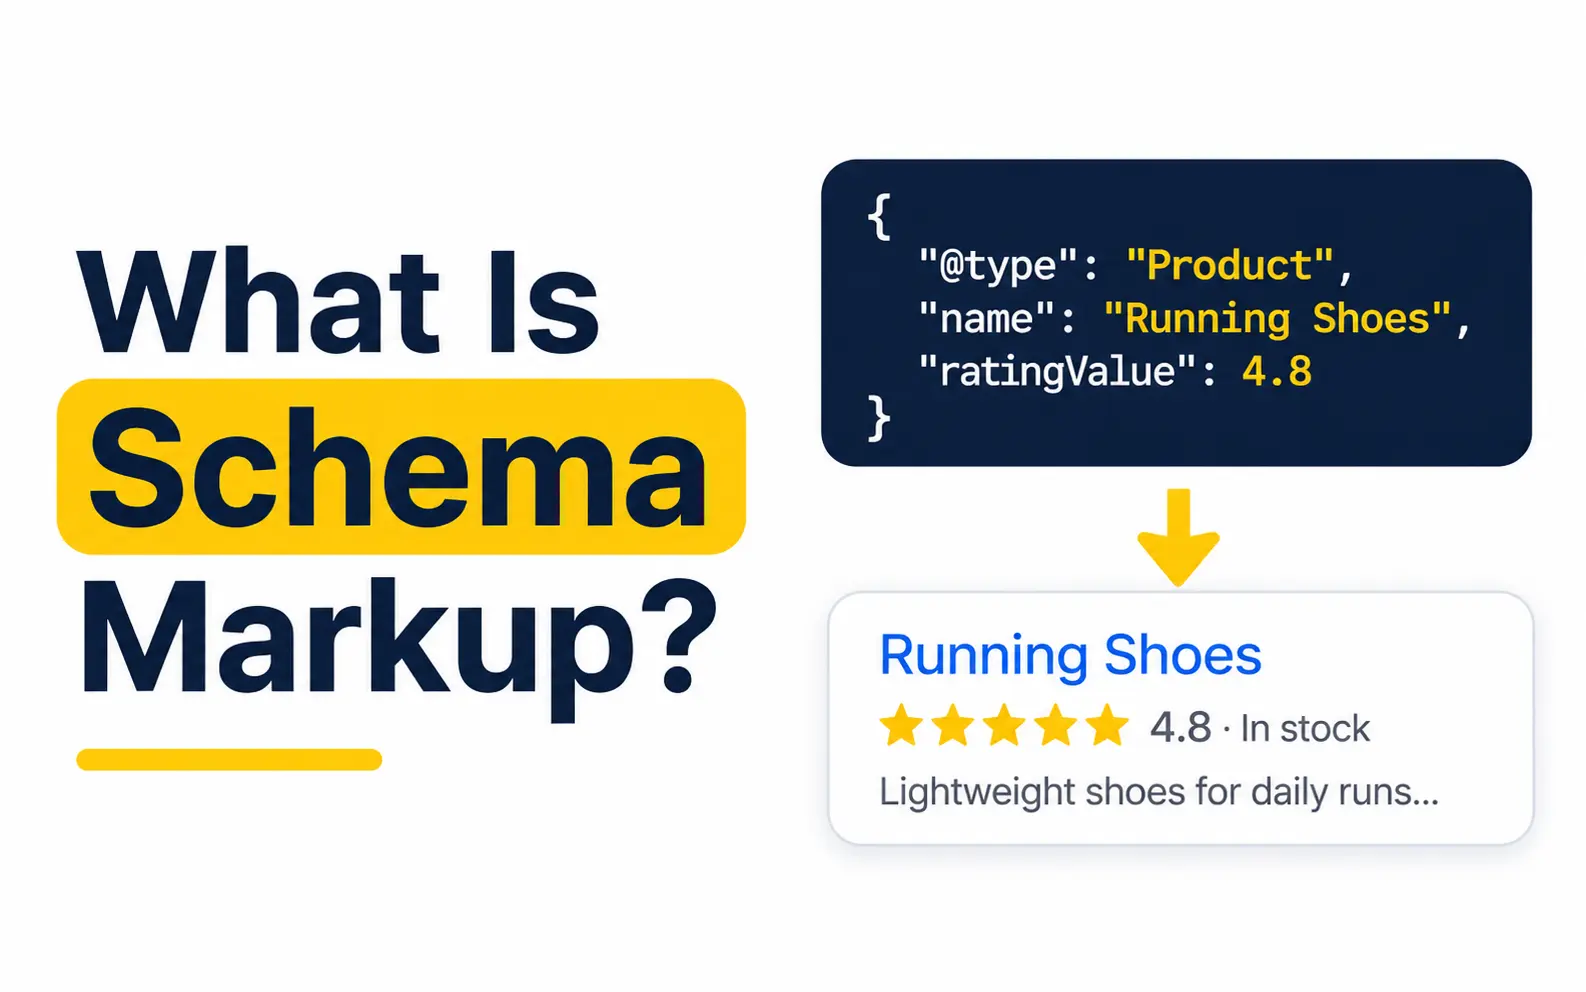
    It is a small block of code that labels your content for machines. When you add it correctly, Google can show richer listings with stars, prices, and breadcrumbs. It also helps search engines connect your brand to the right real-world entity.

    In this guide, the SEO team at 4P Wisdom explains everything. You will learn what schema markup is and how it works. You will see which types still matter in 2026. Then we walk you through implementation, one simple step at a time.

    No coding degree required.

    What Is Schema Markup?

    Schema markup is structured data you add to a webpage using the Schema.org vocabulary. It tells search engines what your content means, not just what it says. Most websites add it as a JSON-LD script inside the page code. Google uses it to understand pages and to power rich results.

    Here is a simple way to picture it.

    Think of your webpage as a moving box full of items. Without labels, the movers must open the box and guess what is inside. Schema markup is the label on the outside. It says “kitchen, glasses, fragile” in one quick glance.

    Humans see a friendly page with photos and text. Search engine crawlers see clean, labeled facts. Both audiences get exactly what they need.

    Where Did Schema.org Come From?

    Schema.org launched in 2011 as a joint project. Google, Microsoft (Bing), and Yahoo built it together. Yandex joined later that same year. The goal was one shared vocabulary that every major search engine could read.

    Today, the vocabulary holds around 800 types and roughly 1,500 properties. An open community group at the W3C helps maintain it. JSON-LD, the most popular format, is also an official W3C standard. That shared foundation is why one block of code works across Google, Bing, and other platforms.

    Schema Markup vs Structured Data vs Rich Results
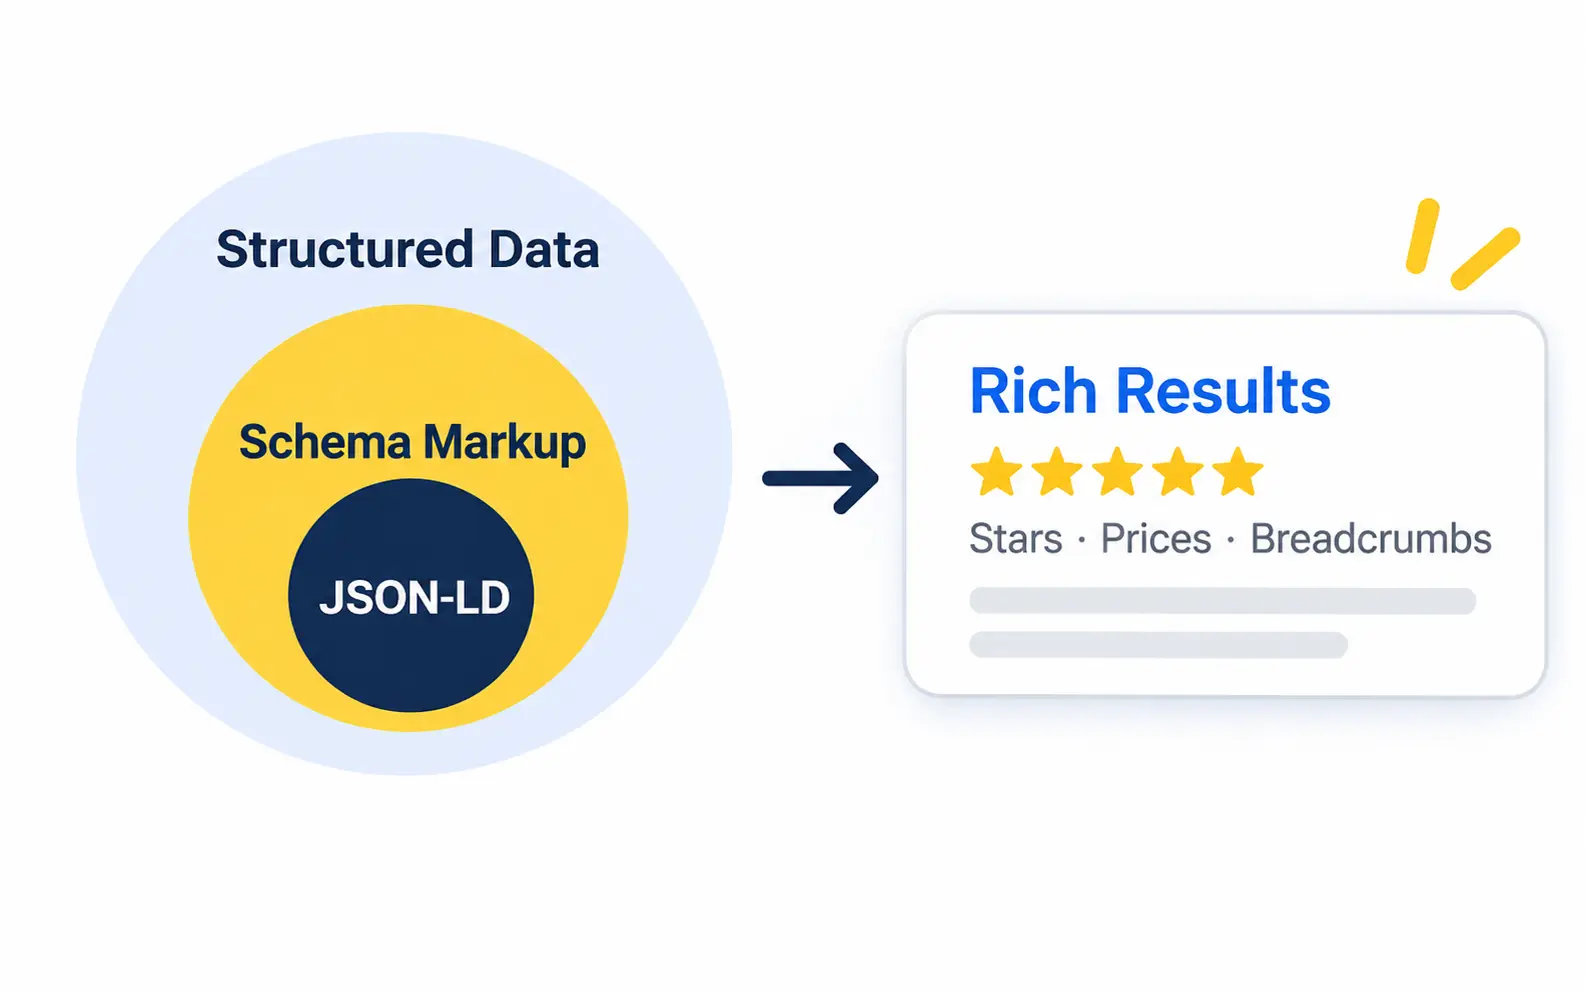
    Diagram showing schema markup inside structured data leading to rich results
    People often mix these three terms up. They are related, but they are not the same thing.

    Structured data is any information organized in a machine-readable format. It is the broad category.

    Schema markup is structured data written with the Schema.org vocabulary. It is the specific language most websites use.

    Rich results are the enhanced search listings Google may show because of that markup. Common examples include star ratings, product prices, and breadcrumb trails.

    So you add schema markup, which is a type of structured data. In return, your page may become eligible for rich results. Eligibility is the keyword here. Google never guarantees a rich result.

    How Does Schema Markup Work?
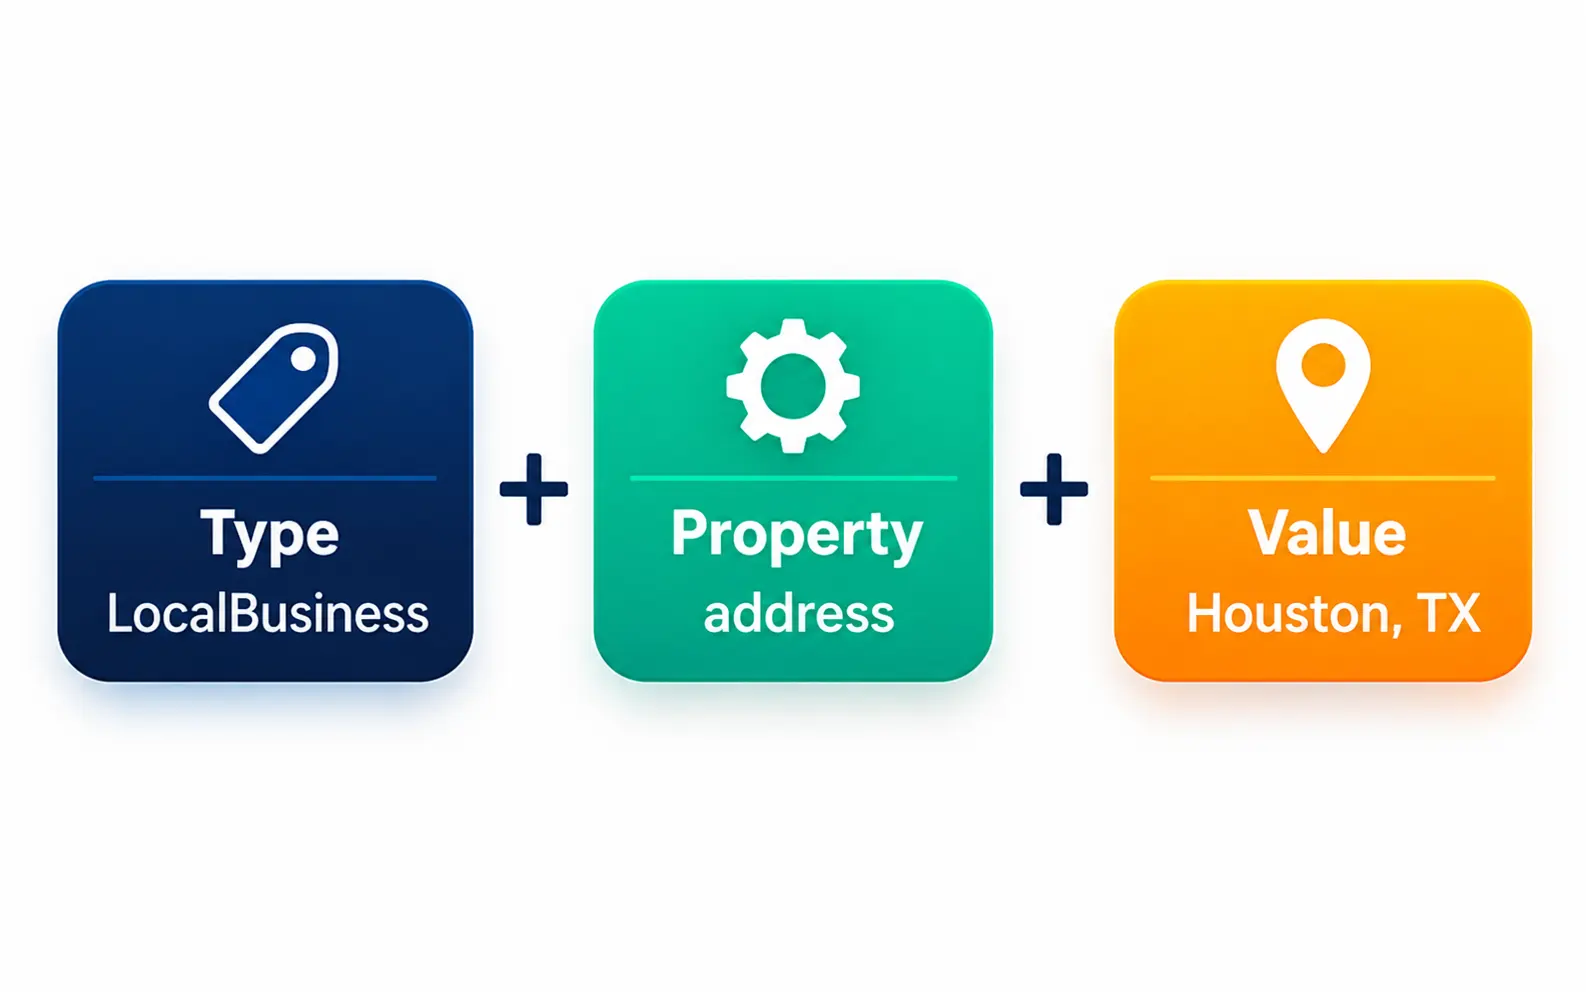
    Schema building blocks: type, property and value

    Schema markup works through three building blocks: types, properties, and values.

    1. Type describes what the thing is. Examples include LocalBusiness, Product, Article, or Person.
    2. Property describes a detail about that thing. Examples include name, address, price, or author.
    3. Value is the actual information. Examples include “4P Wisdom” or “Houston, Texas.”

    Every type sits inside a family tree. At the very top is a root type called Thing. Below it sit broad types like Organization, Place, Product, Event, and CreativeWork. These branch into hundreds of specific subtypes.

    For example, LocalBusiness is a subtype of Organization. AutoRepair is a subtype of LocalBusiness. Choosing the most specific type gives search engines the clearest signal.

    Types can also nest inside each other. A Product can contain an Offer, and that Offer can contain a price. An Article can contain an author, and that author can be a Person. This nesting is how you describe real relationships between things.

    Here is what happens after you publish your markup:
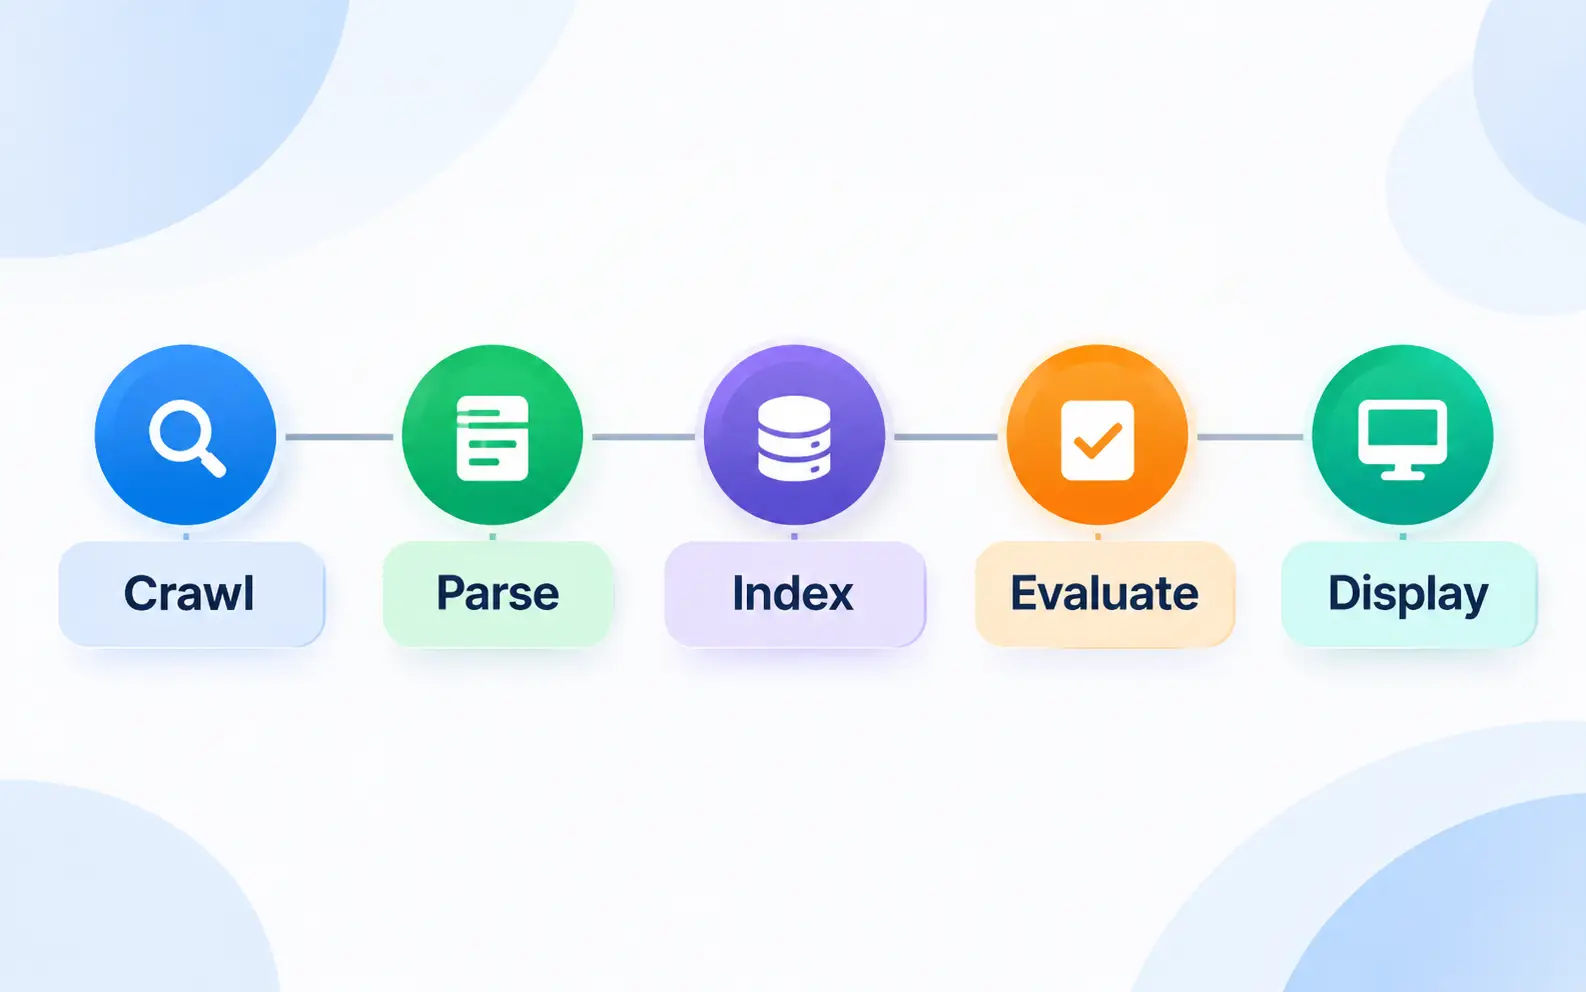
    Five steps Google takes from crawling schema to showing rich results

    1. Googlebot crawls your page and finds the script.
    2. Google parses the labeled facts and checks them against its guidelines.
    3. The data feeds Google’s index and, in many cases, the Knowledge Graph.
    4. Google decides whether the page qualifies for any rich result.
    5. If quality and relevance line up, an enhanced listing may appear.

    Why Schema Markup Matters for SEO in 2026

    Schema markup is not magic. It will not rescue thin content or a weak website. But on a strong page, it adds clarity, visibility, and trust signals.

    Rich Results Can Earn More Clicks

    Rich results take up more space and give searchers useful details upfront. That often means more qualified clicks.

    Google has published several case studies on this. According to Google Search Central, Rotten Tomatoes saw a 25% higher click-through rate on pages with structured data. Nestlé measured an 82% higher click-through rate on pages showing rich results. Rakuten found users spent 1.5 times longer on pages using structured data.

    Your ranking position may stay the same. But a richer listing can pull more searchers toward your result.

    It Strengthens Entity Understanding

    Modern search runs on entities, not just keywords. An entity is a distinct person, place, brand, or concept.

    Organization schema with logo, address, and sameAs links helps Google recognize your brand clearly. Person schema connects your content to real authors with real expertise. This supports the trust signals behind E E A T, which means Experience, Expertise, Authoritativeness, and Trustworthiness.

    Clear entity signals can influence knowledge panels and brand searches. They also reduce the risk of Google confusing you with a similarly named business.

    It Supports Local Search Visibility

    For local businesses, LocalBusiness schema reinforces your name, address, phone number, and hours. When these details match your Google Business Profile, Google sees one consistent story.

    Consistency is a quiet but powerful local signal. It ties into how Google judges relevance, distance, and prominence for local rankings. If your profile needs work, our Google Business Profile optimization services can align every detail.

    What About AI Search?

    This is where many guides overpromise. Here is what the evidence actually shows.

    Google states there is no special schema needed to appear in AI Overviews or AI Mode. Its AI features documentation treats structured data as a standard SEO best practice. Google also asks that your structured data match the visible text on the page.

    Gemini grounds many answers using Google’s own search index. Since that index parses structured data, schema can influence AI answers indirectly.

    Other AI platforms work differently. Tools like ChatGPT and Perplexity often treat schema as plain text, not labeled data. Many AI crawlers, such as GPTBot and PerplexityBot, also do not run JavaScript. So schema injected only through JavaScript may stay invisible to them.

    The smart move is simple. Add accurate schema directly in your HTML, and back it with genuinely helpful content. Want the bigger picture? Read our guide on how to rank in Google’s AI Overviews.

    Is Schema Markup a Ranking Factor?

    No. Google has confirmed that structured data is not a direct ranking factor. It helps Google understand your page and qualify it for rich features. Any traffic gain usually comes from better visibility and click-through rate, not higher rankings.

    Three Schema Formats: JSON-LD, Microdata, and RDFa
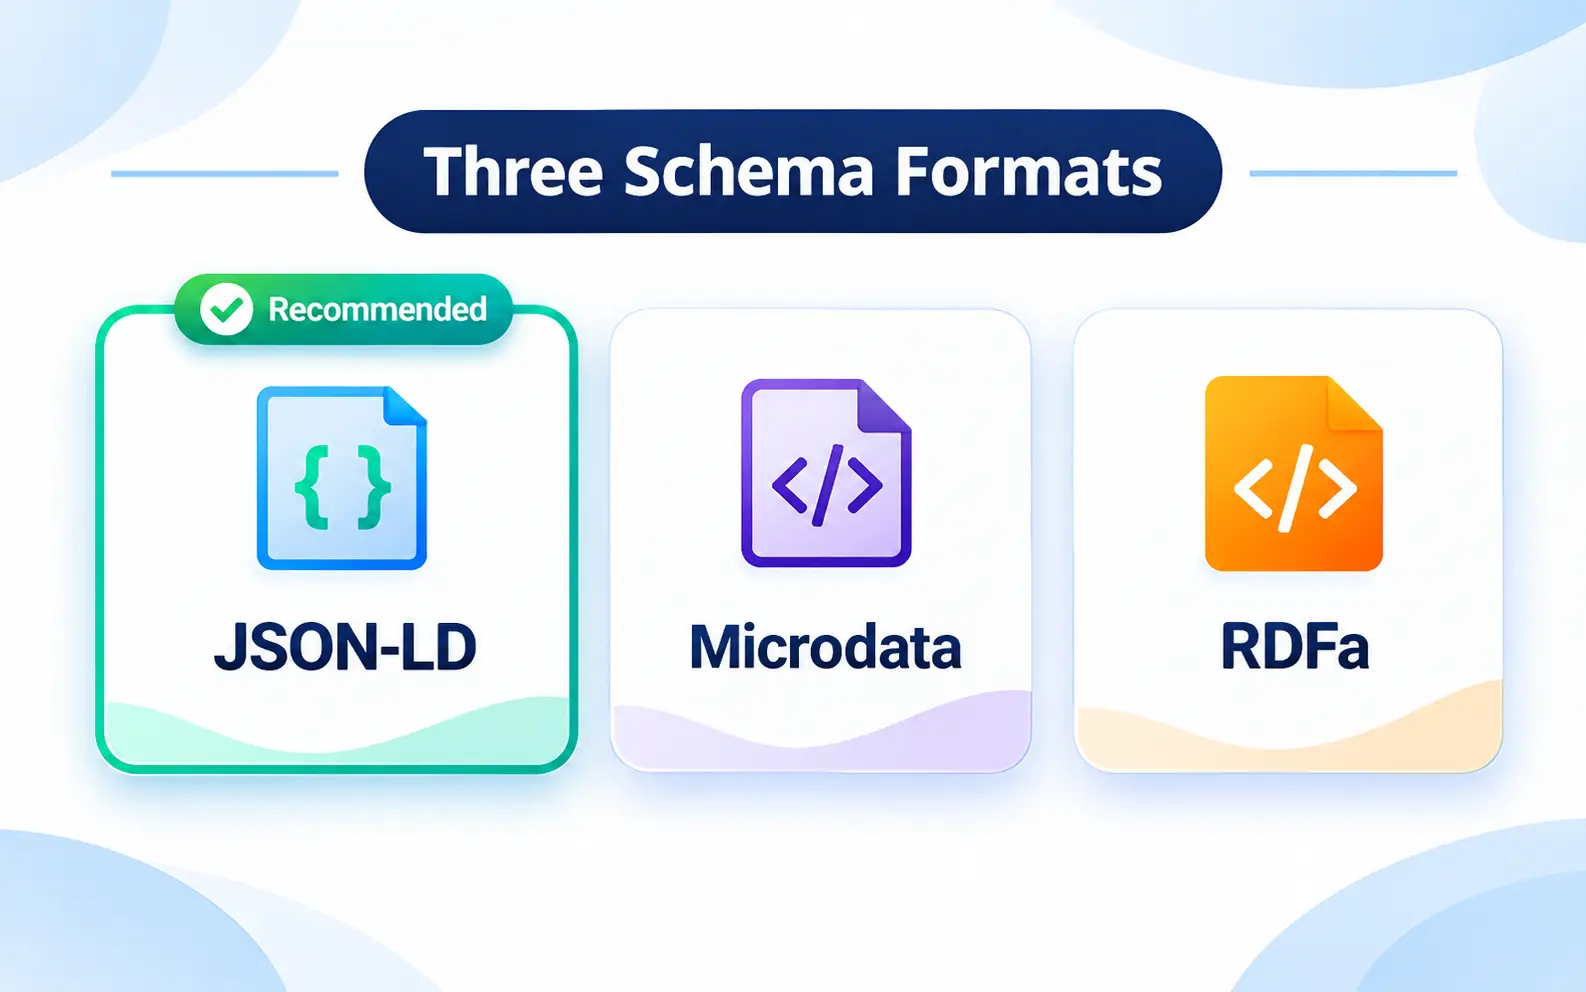
    Comparison of JSON-LD, Microdata and RDFa

    You can write schema markup in three formats. All three use the same Schema.org vocabulary.

    JSON-LD stands for JavaScript Object Notation for Linked Data. It sits in one clean script block, separate from your visible HTML. Google recommends it for most use cases because it is easier to write and maintain.

    Microdata adds attributes directly to your existing HTML tags. It works, but it spreads markup across your template. That makes errors easier to create and harder to spot.

    RDFa is an older HTML extension that works in a similar way to Microdata. You will mostly see it on legacy websites.

    Our recommendation is JSON-LD for nearly every website. One small exception exists. Google suggests Microdata for discussion forum pages to avoid duplicating long text blocks.

    Which Schema Types Should You Use in 2026?

    Schema.org lists hundreds of types, but Google supports only a few dozen for rich features. Focus on types that match your content and Google’s search gallery.

    Organization Schema

    Add this to your homepage or About page. Include your name, logo, URL, contact details, and sameAs links to official profiles. It helps Google identify your brand and may shape your knowledge panel.

    LocalBusiness Schema

    This is essential for any business with a physical location or service area. Use the most specific subtype available, such as AutoRepair, Dentist, Plumber, or Restaurant. Include address, phone, opening hours, geo coordinates, and price range.

    Article and BlogPosting Schema

    Use these on blog posts, news stories, and guides. Include headline, image, author, datePublished, and dateModified. This helps Google display accurate titles, images, and dates.

    Person Schema

    Use Person schema for authors and team members. Link it to author bio pages and professional profiles. This directly supports your E E A T signals.

    BreadcrumbList Schema

    Breadcrumb schema shows where a page sits in your site structure. Google can display that trail in search results instead of a raw URL. It pairs perfectly with a smart internal linking strategy, since both reveal your site hierarchy.

    Product and Merchant Listing Schema

    Ecommerce stores should use Product schema with nested Offer details. Include price, currency, availability, shipping, and return policies. Google uses this data in product snippets, merchant listings, and shopping features.

    Review and AggregateRating Schema

    These schema types can display star ratings in search results. However, one rule trips up many businesses. Google will not show stars for self-serving reviews.

    That means a business cannot mark up testimonials about itself for star ratings. Stars work for reviews of other things, such as products, books, or recipes.

    Event Schema

    Use this for concerts, webinars, workshops, and classes. Include name, start date, location, and ticket details. Keep the event status updated if plans change.

    VideoObject Schema

    Use this on pages where a video is the main content. Include name, description, thumbnail URL, upload date, and duration. It helps videos appear in video results and key moments.

    Other Useful Types

    Depending on your content, you may also use Recipe, JobPosting, SoftwareApplication, ProfilePage, or DiscussionForumPosting. Always choose types that match what users actually see on the page.

    What Changed: Retired Rich Results You Should Know About

    Google regularly adds, limits, and removes rich result features. Many older guides have not caught up. Here is the current picture.

    HowTo rich results were fully removed in September 2023.

    Seven lesser-used types were deprecated in June 2025. These included Course Info and Learning Video, with a phased API removal and grace period.

    FAQ rich results are now gone for everyone. Google officially retired them from Search on May 7, 2026, after phasing them out since 2023. 

    Does that mean you should delete your FAQ markup? Not necessarily. Google says it will keep using FAQ structured data to understand pages, even without showing the rich result. FAQPage also remains a valid Schema.org type. 

    The lesson is clear. Rich results come and go, but accurate structured data keeps its value. Use schema to describe great content, never to replace it.

    Schema Markup Examples You Can Copy

    Below are three ready-to-use JSON-LD examples. Replace the sample details with your real business information.

    Example 1: LocalBusiness Schema for an Auto Repair Shop

    JSON

    <script type=”application/ld+json”>

    {

      “@context”: “https://schema.org”,

      “@type”: “AutoRepair”,

      “name”: “Eldridge Auto Care”,

      “url”: “https://www.example.com”,

      “logo”: “https://www.example.com/logo.png”,

      “telephone”: “+17135550100”,

      “priceRange”: “$$”,

      “address”: {

        “@type”: “PostalAddress”,

        “streetAddress”: “100 Main Street”,

        “addressLocality”: “Houston”,

        “addressRegion”: “TX”,

        “postalCode”: “77041”,

        “addressCountry”: “US”

      },

      “openingHoursSpecification”: {

        “@type”: “OpeningHoursSpecification”,

        “dayOfWeek”: [“Monday”, “Tuesday”, “Wednesday”, “Thursday”, “Friday”],

        “opens”: “08:00”,

        “closes”: “18:00”

      },

      “sameAs”: [

        “https://www.facebook.com/example”,

        “https://www.instagram.com/example”

      ]

    }

    </script>

    Example 2: BlogPosting Schema With an Author

    json

    <script type=”application/ld+json”>

    {

      “@context”: “https://schema.org”,

      “@type”: “BlogPosting”,

      “headline”: “What Is Schema Markup and How Do You Implement It?”,

      “image”: “https://www.example.com/images/schema.jpg”,

      “author”: {

        “@type”: “Person”,

        “name”: “Jane Smith”,

        “url”: “https://www.example.com/team/jane”

      },

      “publisher”: {

        “@type”: “Organization”,

        “name”: “Example Agency”,

        “logo”: “https://www.example.com/logo.png”

      }

    }

    </script>

    Add datePublished and dateModified using the ISO 8601 date format. Update dateModified only when you make meaningful content changes.

    Example 3: BreadcrumbList Schema

    json

    <script type=”application/ld+json”>

    {

      “@context”: “https://schema.org”,

      “@type”: “BreadcrumbList”,

      “itemListElement”: [

        {

          “@type”: “ListItem”,

          “position”: 1,

          “name”: “Home”,

          “item”: “https://www.example.com/”

        },

        {

          “@type”: “ListItem”,

          “position”: 2,

          “name”: “Blog”,

          “item”: “https://www.example.com/blog/”

        },

        {

          “@type”: “ListItem”,

          “position”: 3,

          “name”: “Schema Markup Guide”

        }

      ]

    }

    </script>

    How to Implement Schema Markup: Step by Step
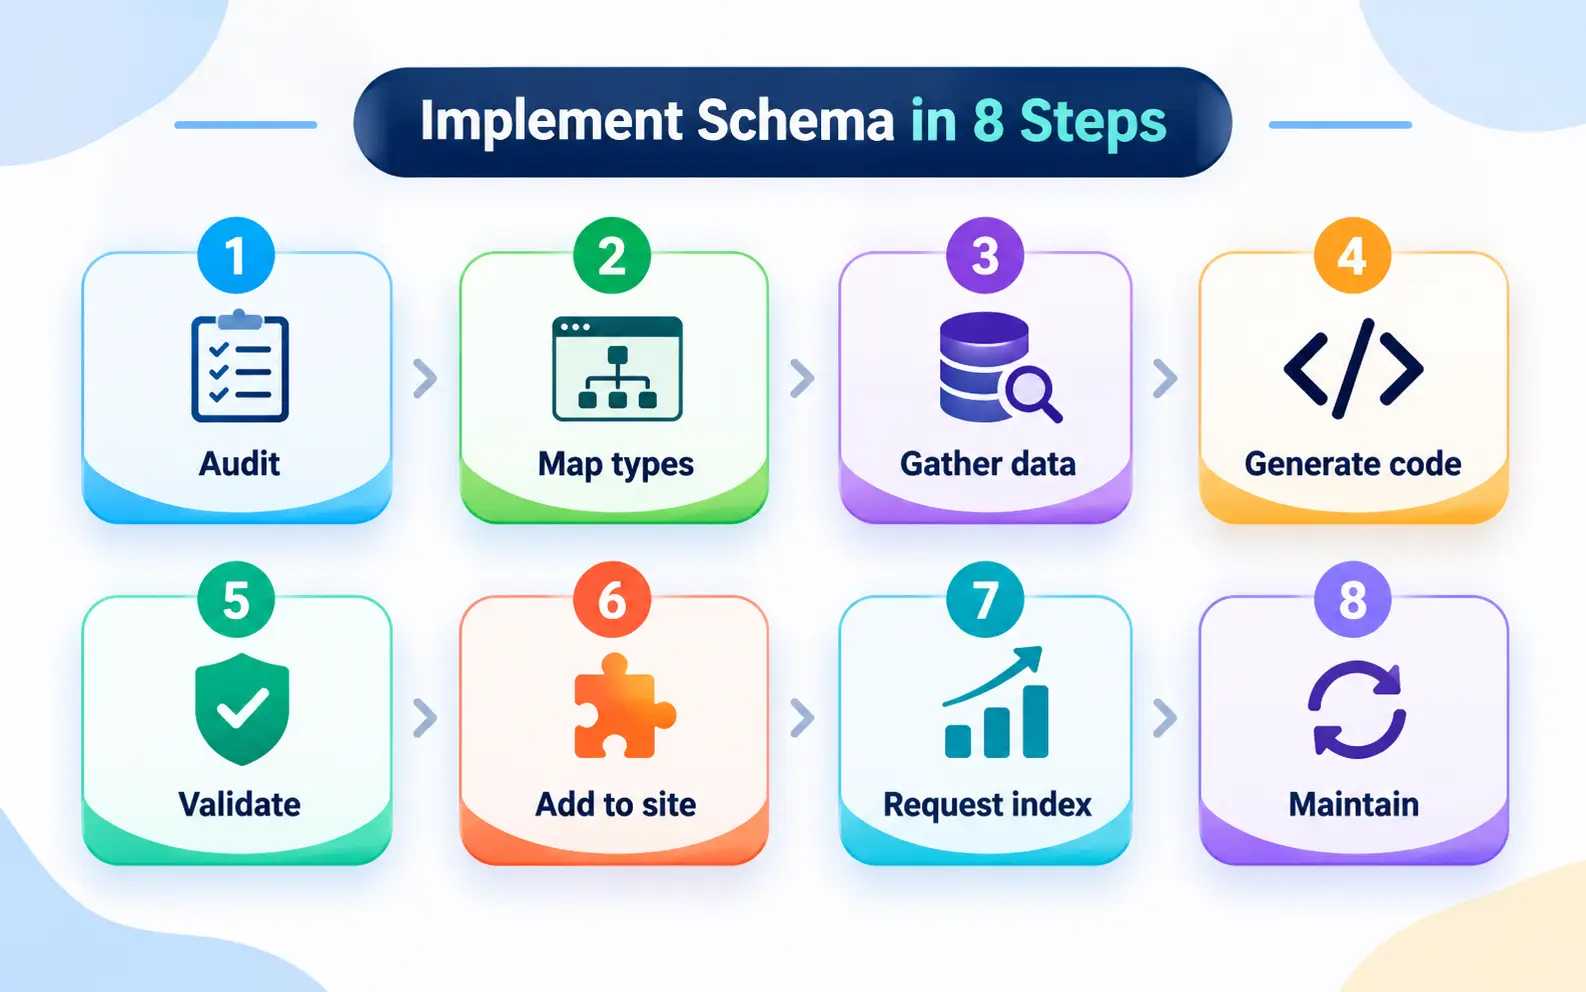
    Eight-step checklist for implementing schema markup

    Now for the practical part. Follow these eight steps to add schema markup the right way.

    Step 1: Audit Your Existing Schema

    Many websites already have schema from their theme or SEO plugin. Check before you add anything new. Otherwise, you may create duplicate or conflicting markup.

    Run your key pages through the Rich Results Test. For larger sites, use a crawler like Screaming Frog, Semrush Site Audit, or Ahrefs Site Audit.

    Step 2: Map Each Page Type to a Schema Type

    List your main page templates. Then match each one to the best schema type.

    1. Homepage: Organization or LocalBusiness, plus WebSite
    2. About page: Organization and Person
    3. Service pages: Service, connected to your LocalBusiness
    4. Blog posts: BlogPosting or Article, plus BreadcrumbList
    5. Product pages: Product with Offer
    6. Location pages: the most specific LocalBusiness subtype

    More schema is not always better. Mark up the main topic of each page, not every tiny detail.

    Step 3: Gather Accurate Information

    Collect your business name, address, phone number, hours, logo, and social profiles. Make sure these details match your Google Business Profile exactly. Even small differences, like “Street” versus “St,” can create mixed signals.

    Our Google Business Profile optimization checklist helps you get those details aligned.

    Step 4: Generate the Schema Code

    You have four easy options.

    1. Write it manually using Schema.org documentation. This gives you full control.
    2. Use a generator like the Merkle (Dentsu) Schema Markup Generator or Google’s Structured Data Markup Helper.
    3. Use an AI assistant such as ChatGPT, Gemini, or Claude. Always validate the output before publishing.
    4. Use a CMS plugin that generates schema automatically.

    Here is a simple AI prompt you can try:

    “Create JSON-LD schema for my [page type]. Use these details: [paste details]. Follow Google’s structured data guidelines.”

    Step 5: Validate Before You Publish

    Never push schema live without testing it first. Paste your code into the Rich Results Test. It shows errors, warnings, and the rich results your page may qualify for.

    Then check it in the Schema Markup Validator. This tool validates against the full Schema.org vocabulary, not just Google features.

    Step 6: Add the Schema to Your Website

    How you add schema depends on your platform.

    WordPress: Plugins like Yoast SEO and Rank Math add core schema automatically. You can adjust page and article types inside each post. Explore our list of the best WordPress SEO plugins for more options.

    Hand-coded websites: Paste the script inside the head section of your HTML file. Placing it in the body also works, and Google reads both.

    Shopify, Wix, Webflow, and Squarespace: Most add basic schema by default. Each platform also lets you add custom code for advanced types.

    Google Tag Manager: This works for Google, which can render JavaScript. But many AI crawlers cannot. If AI visibility matters to you, place schema directly in your HTML.

    Step 7: Request Indexing and Monitor

    After publishing, test the live URL again. Then use URL Inspection in Google Search Console to request indexing.

    Google needs to recrawl your page before any rich result appears. That can take a few days or a few weeks.

    Step 8: Maintain Your Schema

    Schema is not a one-time task. Prices change, hours change, and authors move on. Outdated markup can mislead users and break Google’s guidelines.

    Review your schema every quarter. Also review it after any redesign, migration, or plugin update.

    Build a Connected Schema Graph With @id
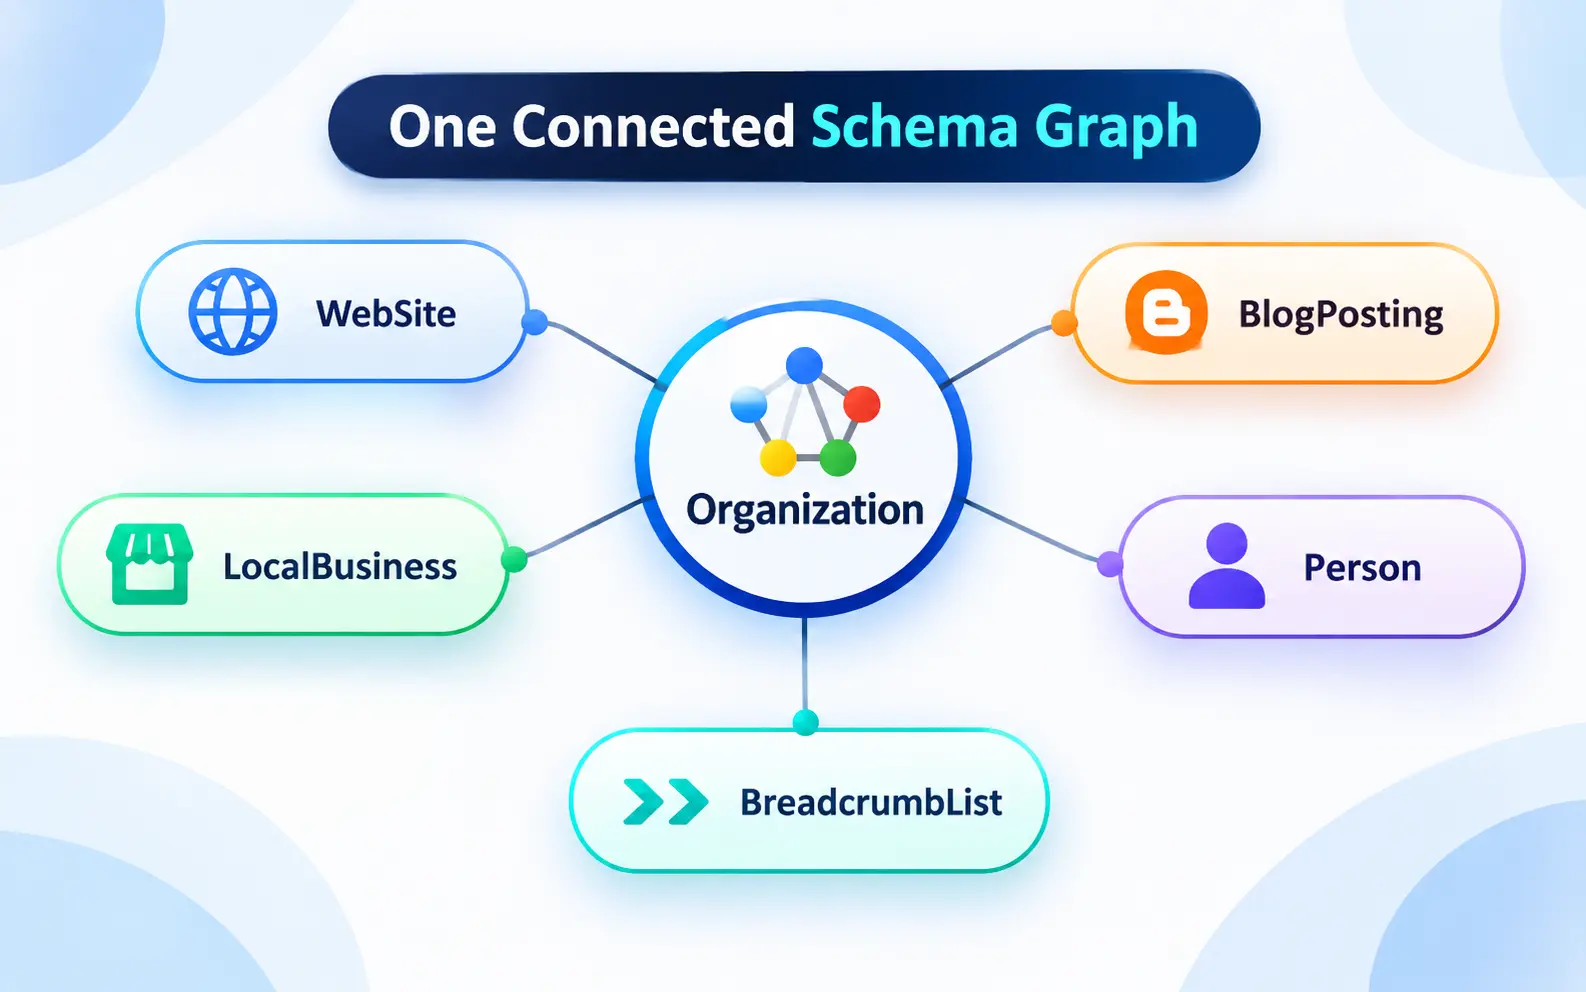
    Connected schema graph linking Organization to WebSite, BlogPosting and Person

    Most competitors stop at basic schema. Advanced SEO goes one step further by connecting entities into one graph.

    The @id property gives each entity a permanent, unique identifier. Think of it as a name tag that other schema blocks can reference.

    For example, your Organization can have an @id on your homepage. Every blog post can then reference that same @id as its publisher. Each author Person can also have an @id linked to their bio page.

    Here is a short example:

    json

    {

      “@context”: “https://schema.org”,

      “@type”: “Organization”,

      “@id”: “https://www.example.com/#organization”,

      “name”: “Example Agency”,

      “url”: “https://www.example.com/”,

      “sameAs”: [

        “https://www.linkedin.com/company/example”,

        “https://www.facebook.com/example”

      ]

    }

    Any other page can now say its publisher is “https://www.example.com/#organization.” Google sees one consistent brand entity across your whole website.

    This connected structure is called a knowledge graph of your own site. It strengthens entity clarity, authorship, and brand trust in both classic and AI search.

    One warning here. Double-check every sameAs link. A wrong link can tell Google you own a website you do not.

    How to Test and Monitor Schema Markup

    Use the right tool for each job.

    1. Rich Results Test: Checks Google rich result eligibility for one page or code snippet.
    2. Schema Markup Validator: Checks all Schema.org markup, including types Google does not display.
    3. Search Console URL Inspection: Shows how Google sees structured data on a live URL.
    4. Search Console Enhancements reports: Show valid items, warnings, and errors across your whole site.
    5. Bing Webmaster Tools: Helps you monitor how Bing reads your pages. This matters because Bing powers several AI search experiences.
    6. Site crawlers: Tools like Screaming Frog and Semrush find schema errors at scale.

    How to Measure the Impact of Schema Markup

    Schema success shows up in visibility and engagement, not rankings alone.

    Open the Performance report in Google Search Console. Use the Search appearance filter to isolate clicks and impressions from rich results. Then compare click-through rates before and after implementation.

    Track a few pages at a time for clean results. Give each change at least four to six weeks before judging it.

    For a complete measurement framework, explore our guide to SEO KPIs for organic and AI search growth.

    Common Schema Markup Mistakes to Avoid

    Small schema mistakes can cost you rich results. Serious ones can even trigger a manual action. Watch out for these common problems.

    Marking Up Content Users Cannot See

    Your schema must match what visitors see on the page. Adding hidden reviews or fake prices breaks Google’s structured data policies.

    Using Self-Serving Review Stars

    Do not mark up your own testimonials to get star ratings. Google ignores them and may treat them as spam.

    Choosing the Wrong Schema Type

    Marking a blog post as a Product confuses search engines. Always match the type to the main purpose of the page.

    Running Duplicate Schema From Multiple Sources

    Your theme, plugin, and custom code may each output schema. This creates conflicting signals. Keep one clear source of truth.

    Leaving Outdated Information

    Old prices, closed locations, and wrong hours hurt user trust. Update your schema whenever your business details change.

    Adding Schema to the Wrong URL Version

    Schema belongs on the canonical, indexable version of each page. Learn more in our guide on canonical tags. During migrations, use the right redirects too. Our article on the difference between 301 and 302 redirects explains which one preserves your signals.

    Ignoring Syntax Errors

    One missing comma or bracket can break your whole script. Always validate after every edit.

    Expecting Guaranteed Rich Results

    Valid schema makes you eligible, nothing more. Google decides based on quality, relevance, and the search query.

    Schema Markup Checklist by Business Type

    Not sure where to start? Use these quick starter plans.

    Local service businesses such as plumbers, dentists, and law firms: LocalBusiness subtype, Organization, Service, BreadcrumbList, and Person for key staff.

    Auto repair shops: AutoRepair schema, Service for each repair type, opening hours, and consistent NAP details. Pair this with our auto repair shop marketing strategies for more leads.

    Ecommerce stores: Product with Offer, merchant listing details, AggregateRating for genuine product reviews, BreadcrumbList, and Organization.

    Blogs and publishers: BlogPosting or Article, Person for authors, BreadcrumbList, WebSite, and Organization.

    SaaS companies: SoftwareApplication, Organization, Article for blog content, and VideoObject for product demos.

    Schema works best inside a complete SEO plan. Our complete SEO checklist shows where structured data fits among other priorities.

    When Should You Get Expert Help?

    Basic schema is easy with plugins. Advanced schema is a different story.

    You may need expert help if you run multiple locations or a large ecommerce catalog. The same goes for complex entity graphs and site migrations. Schema errors at scale can quietly drain your visibility for months.

    At 4P Wisdom, we audit, build, and maintain schema as part of our technical SEO services. We make sure every page sends clean, consistent signals to Google and AI search platforms.

    Final Thoughts

    Schema markup is one of the simplest ways to help search engines understand your website. It turns your content into clear, labeled facts that machines trust.

    It will not replace great content or strong backlinks. But it helps great content get noticed, clicked, and correctly understood.

    Start with the basics: Organization, LocalBusiness, Article, and BreadcrumbList. Validate everything. Keep your details consistent. Then build toward a connected entity graph as your website grows.

    Want to see what schema can do for your business? Contact 4P Wisdom for a structured data audit today.

    Frequently Asked Questions

    1. Is schema markup a Google ranking factor?

    No, schema markup is not a direct ranking factor. It helps Google understand your content and qualify for rich results. Those richer listings can raise your click-through rate and bring more organic traffic.

    2. Should I remove FAQ schema now that Google retired FAQ rich results?

    You do not need to remove it. Google says it still uses FAQ structured data to understand pages. Keep it if it accurately describes visible FAQ content. Just stop expecting the dropdown rich result.

    3. How long does it take for rich results to appear?

    It usually takes a few days to a few weeks. Google must recrawl and reprocess your page first. You can speed this up by requesting indexing in Google Search Console.

    4. Can I add schema markup without coding skills?

    Yes. Plugins like Yoast SEO and Rank Math add core schema automatically on WordPress. Platforms like Shopify and Wix also include basic schema. Free generators can create custom code you simply copy and paste.

    5. Does schema markup help with AI Overviews and ChatGPT?

    Google says no special schema is required for AI Overviews. Still, accurate schema helps Google understand your entities, and Gemini relies on Google’s index. For other AI tools, place schema directly in HTML, since many AI crawlers skip JavaScript.

    6. Can schema markup hurt my website?

    Correct schema will not hurt you. Misleading schema can, though. Fake reviews, hidden content, or false details may trigger a manual action. That penalty removes your rich result eligibility until you fix the problem.
  • What Is an XML Sitemap? Benefits, SEO & How to Create One

    What Is an XML Sitemap? Benefits, SEO & How to Create One

    Imagine a library with no catalog. Visitors could still find books by wandering the shelves. But some books would stay hidden for years.

    Your website works the same way. Search engines discover pages by following links. Pages with few links can stay hidden for a long time.

    An XML sitemap is your website’s catalog. It hands search engines a clean list of the pages you want found.

    In this guide, the SEO team at 4P Wisdom explains everything in plain English. You will learn what an XML sitemap is and how it works. You will see its real SEO benefits and its limits. Then we show you how to create, submit, and fix one, step by step.

    What Is an XML Sitemap?

    An XML sitemap is a file that lists the important URLs on your website. It helps search engines like Google and Bing discover, crawl, and index your pages.

    XML stands for Extensible Markup Language. It is a structured format that machines read easily. Most sitemaps live at a simple address, such as yourdomain.com/sitemap.xml.

    A sitemap can also share extra details about each page. For example, it can show when a page last changed. It can also list images, videos, news articles, and language versions.

    Think of it as a direct message to search engines. It says, “These are my best pages. Please look at them.”

    A Short History of the Sitemaps Protocol

    Google introduced the Sitemaps protocol in 2005. Yahoo and Microsoft joined in 2006 and adopted one shared standard. That standard lives today at sitemaps.org.

    Because the major engines agreed on one format, a single sitemap works across Google, Bing, Yahoo, and others. Bing data also powers several AI search tools, so one file reaches far.

    XML Sitemap vs HTML Sitemap

    These two sound alike, but they serve different audiences.

    An XML sitemap is built for search engine crawlers. Visitors rarely see it.

    An HTML sitemap is a normal webpage built for people. It links to your main sections, so visitors can find content quickly.

    Most websites need an XML sitemap. An HTML sitemap is optional, but helpful for large sites with complex menus.

    How Does an XML Sitemap Work?

    Search engines find pages in two main ways. They follow links, and they read sitemaps.

    Here is what happens after you publish a sitemap:

    1. Googlebot finds your sitemap through Search Console or your robots.txt file.
    2. It reads the list of URLs inside the file.
    3. It compares those URLs with pages it already knows.
    4. It schedules new or updated pages for crawling.
    5. It crawls those pages and decides whether to index them.

    Keep one key fact in mind. A sitemap is a hint, not a command. Google decides what to crawl and index based on quality and many other signals.

    What Does an XML Sitemap Look Like?

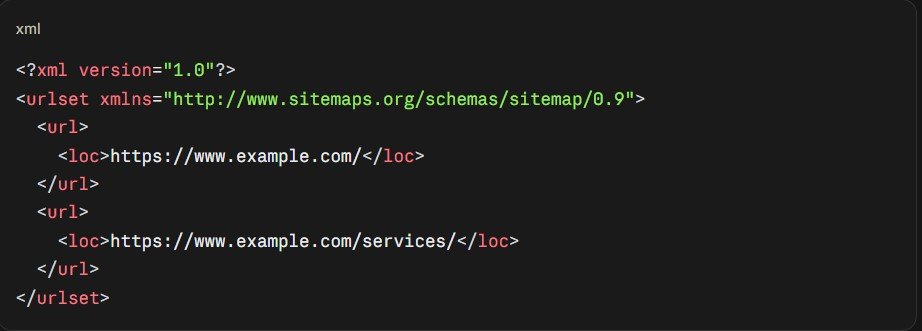
    A basic XML sitemap is surprisingly simple. Here is a small example with two pages:

    Let’s break down each part.

    Required Sitemap Tags

    urlset wraps the entire file. It also declares the sitemap namespace, which tells crawlers which rules to follow.

    url wraps each individual page entry.

    loc holds the full address of the page. It is the only tag every entry must include.

    Optional Sitemap Tags (and What Google Actually Uses)

    The protocol also offers three optional tags. Google treats them very differently.

    lastmod shows when a page last changed in a meaningful way. It uses the W3C Datetime format, usually year, month, and day. Google uses lastmod when it stays consistently accurate.

    changefreq suggests how often a page changes, such as weekly or monthly. Google ignores this tag.

    priority rates a page’s importance from 0.0 to 1.0. Google ignores this tag too.

    Many guides still recommend priority and changefreq. You can skip both. Focus on keeping lastmod honest instead.

    What counts as a meaningful change? Google points to updates in main content, structured data, or links. A new copyright year in your footer does not count.

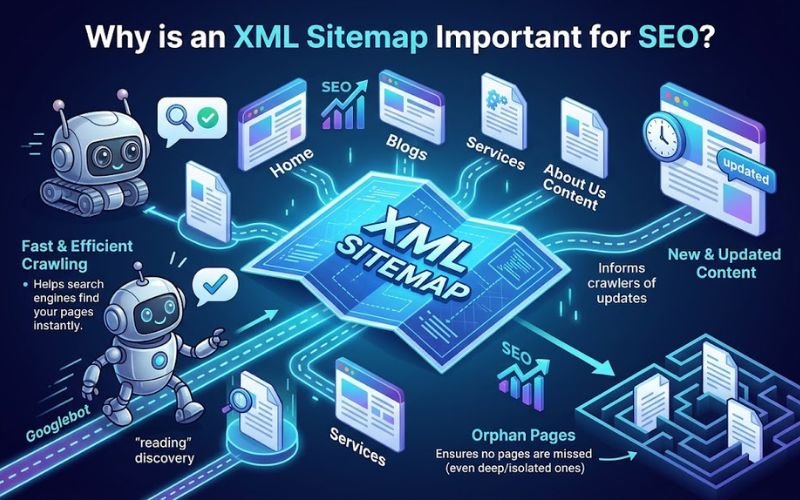
    Why Is an XML Sitemap Important for SEO?

    A sitemap will not boost your rankings directly. But it helps the right pages get found faster and more reliably.

    Faster Discovery of New Pages

    New pages often have few internal or external links. A sitemap gives search engines a direct path to them on day one.

    Better Crawl Efficiency

    A clean sitemap points crawlers toward pages that matter. This helps them spend less time on low-value URLs. Learn more in our guide on what crawl budget is and how it impacts SEO.

    Stronger Canonical Signals

    Pages in your sitemap act as a vote for your preferred URLs. Google treats sitemap inclusion as one canonical signal among several. Pair it with proper canonical tags for best results.

    Faster Recrawling of Updated Content

    An accurate lastmod date tells search engines a page has changed. This can speed up recrawling of refreshed content.

    Powerful Indexing Diagnostics

    This benefit gets overlooked the most. Search Console lets you filter indexing reports by sitemap. You can see exactly which listed pages are indexed and which are not.

    Better Discovery of Media and Language Versions

    Sitemap extensions help search engines find images, videos, news articles, and translated pages. These are harder to discover through links alone.

    Support for Fresh AI Search Results

    Bing has stressed that accurate lastmod dates help its systems keep results fresh. This matters for Bing’s own AI answers and tools that rely on its index. Google’s AI features also draw from its standard index, which sitemaps help populate.

    For broader AI visibility tips, read how to rank in Google’s AI Overviews.

    Does Every Website Need an XML Sitemap?

    Not always, but almost every website benefits from one.

    Google says sitemaps help most in these situations:

    1. Your site is large, with hundreds or thousands of pages.
    2. Your site is new and has few backlinks.
    3. Your site has pages with weak internal linking.
    4. You publish lots of images, videos, or news content.

    Google also says a small site may not need one. This applies to sites with roughly 500 pages or fewer that are well linked internally.

    Our advice is simple. Create one anyway. Most platforms generate sitemaps for free, and the diagnostic data alone makes it worthwhile.

    Types of Sitemaps You Should Know

    Google supports several sitemap formats and extensions. Each solves a different problem.

    Standard XML Sitemap

    This is the most common and versatile format. It lists your main pages and supports all extensions.

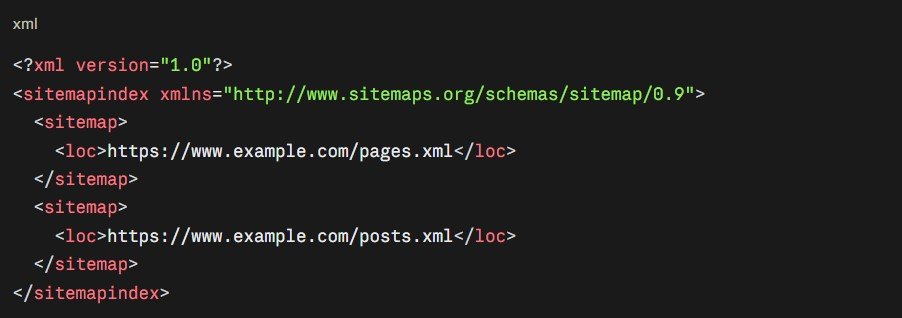
    Sitemap Index File

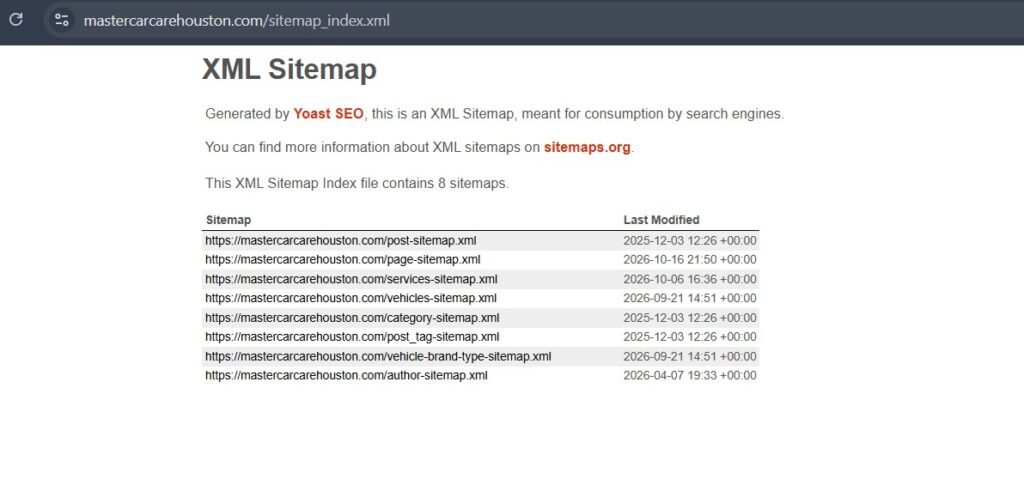
    A sitemap index is a sitemap of sitemaps. It points to several smaller sitemap files. You need one when your site passes the size limits.

    Image Sitemap

    An image sitemap helps Google find images it might otherwise miss. This is useful for images loaded through JavaScript.

    Note one change. In 2022, Google stopped supporting several image tags, including caption, title, and license. Only the image location tag remains useful.

    Images also matter for visual and multimodal search. Read: Can adding more pictures improve SEO?

    Video Sitemap

    A video sitemap shares details like the title, description, thumbnail, and duration. It helps Google show your videos in video results.

    News Sitemap

    News sitemaps are for publishers in Google News. They should only include articles published in the last two days. Each news sitemap can hold up to 1,000 URLs.

    Hreflang Sitemap

    Multilingual websites can list language and regional versions inside the sitemap. This keeps hreflang annotations out of every page’s code. It suits large international sites.

    RSS, Atom, and Text Sitemaps

    Google also accepts RSS 2.0 and Atom 1.0 feeds as sitemaps. These help Google find your newest content fast.

    A text sitemap is the simplest option. It is a plain file with one URL per line. It cannot include dates, images, or videos.

    XML Sitemap Rules and Limits

    Search engines expect your sitemap to follow strict rules. Break them, and your file may fail.

    1. Each sitemap can hold up to 50,000 URLs.
    2. Each file must stay under 50MB uncompressed.
    3. You may compress sitemaps with gzip to save bandwidth.
    4. The file must use UTF-8 encoding.
    5. Every URL must be absolute, including https and the full domain.
    6. Special characters like ampersands must be escaped.
    7. URLs must match your preferred domain version exactly.

    Location matters too. A sitemap affects only pages inside its own folder and below. That is why the root folder is the best home for it.

    There is one exception. If you submit a sitemap through Search Console, Google accepts it from any location you have verified.

    Which Pages Should You Include in Your Sitemap?

    Your sitemap should list only pages you want to appear in search results. Think quality, not quantity.

    Pages to Include

    1. Your homepage and core service pages.
    2. Product and category pages.
    3. Blog posts and helpful guides.
    4. Location pages for local businesses.
    5. Landing pages built for organic search.

    Every URL should return a 200 status code. Each should also be the canonical, indexable version.

    Pages to Exclude

    1. Redirected URLs, including 301 and 302 redirects.
    2. Broken pages that return 404 or 410 errors.
    3. Pages with a noindex tag.
    4. Pages blocked by robots.txt.
    5. Duplicate pages and URLs with tracking parameters.
    6. Thin tag archives, internal search results, and thank you pages.
    7. Login, cart, and checkout pages.

    Including blocked or noindexed pages sends search engines mixed signals. You are asking them to visit a page you also told them to ignore.

    If your sitemap includes old redirected URLs, update them to the final destination. Our guide on the difference between 301 and 302 redirects explains each type.

    How to Create an XML Sitemap

    You have four main options. The best one depends on your platform and site size.

    Option 1: Check if Your Platform Already Has One

    Many website platforms create sitemaps automatically. Before building anything, type yourdomain.com/sitemap.xml into your browser.

    If you see a list of URLs or sitemap files, you already have one. Your job is to review and improve it.

    Popular platforms handle sitemaps like this:

    1. WordPress added a built-in XML sitemap in version 5.5, released in 2020.
    2. Shopify automatically creates a sitemap at yourdomain.com/sitemap.xml.
    3. Wix and Squarespace generate sitemaps automatically for every site.
    4. Webflow offers an automatic sitemap you can switch on in settings.

    Option 2: Use a WordPress SEO Plugin

    WordPress’s default sitemap offers very little control. SEO plugins give you much more.

    Yoast SEO, Rank Math, and All in One SEO all generate smart sitemaps. They let you exclude tags, author archives, and noindexed pages. They also update your sitemap automatically when you publish.

    Not sure which plugin to choose? Compare the best WordPress SEO plugins.

    Option 3: Use a Sitemap Generator Tool

    Generator tools crawl your site and export a sitemap file. They work well for static or custom websites.

    Screaming Frog SEO Spider is a popular choice for technical users. Its free version handles up to 500 URLs. Semrush and other platforms also offer free sitemap generators.

    Remember one drawback. Most generator tools create a one-time file. You must regenerate it whenever your pages change.

    Option 4: Create a Sitemap Manually or With Code

    Small, stable websites can write a sitemap by hand in any text editor. Google suggests this only for sites with a few dozen URLs.

    Larger custom websites should generate sitemaps from their database. Frameworks like Next.js, Django, and Laravel all support automatic sitemap generation. Ask your developer to update the file whenever content changes.

    If your site relies heavily on JavaScript, sitemaps become even more important. Read our guide to JavaScript rendering for SEO to learn why.

    How to Submit Your XML Sitemap to Search Engines

    Creating a sitemap is only half the job. Search engines also need to find it.

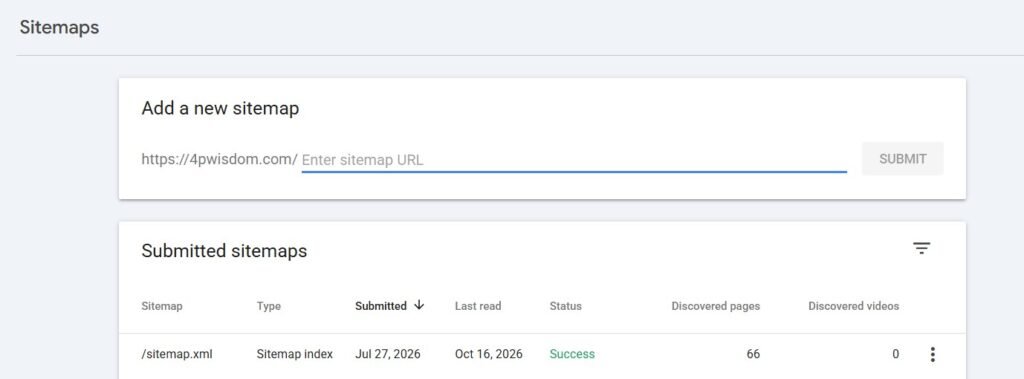
    Submit to Google Search Console

    1. Open Google Search Console and select your property.
    2. Click Sitemaps in the left menu.
    3. Enter your sitemap URL in the Add a new sitemap box.
    4. Click Submit.
    5. Check that the status shows Success.

    If you use a sitemap index, submit only the index file. Google will find the individual sitemaps inside it.

    Submit to Bing Webmaster Tools

    Open Bing Webmaster Tools and go to the Sitemaps section. Submit the same URL there.

    Bing also supports IndexNow, a protocol that pings search engines the moment content changes. Many CMS platforms and SEO plugins support it. Google does not use IndexNow.

    Add Your Sitemap to Robots.txt

    Add a single line anywhere in your robots.txt file:

    Sitemap: https://www.example.com/sitemap.xml

    This helps every search engine find your sitemap automatically. You can list several sitemaps, one per line. Our robots.txt guide explains how sitemaps and crawl rules work together.

    Note: Google No Longer Supports Sitemap Pings

    Older guides tell you to “ping” Google with your sitemap URL. Google retired that ping endpoint in 2023, because most pings were spam.

    Today, Google relies on Search Console submissions, robots.txt references, and accurate lastmod dates. If an old plugin still pings Google, nothing happens.

    How to Check and Fix Sitemap Errors

    A broken sitemap can quietly hurt your indexing. Check it regularly.

    Read the Search Console Sitemaps Report

    The Sitemaps report shows three possible statuses.

    1. Success means Google read your sitemap without problems.
    2. Has errors means Google read it but found issues inside.
    3. Couldn’t fetch means Google could not access the file at all.

    Click any sitemap to see how many URLs Google discovered from it.

    Use the Page Indexing Filter

    This is the most useful sitemap trick most people miss.

    Open the Pages report in Search Console. Use the filter at the top to select All submitted pages. You will now see indexing data for sitemap URLs only.

    Look for pages marked “Crawled, currently not indexed” or “Discovered, currently not indexed.” These are pages you want indexed that Google is ignoring. They usually signal thin content, duplication, or weak internal links.

    Common Sitemap Errors and Fixes

    1. Sitemap could not be read. Check that the file loads in a browser and returns a 200 status.
    2. Invalid XML format. Validate the file and close every open tag.
    3. Unescaped characters. Replace raw ampersands with their escaped version.
    4. URLs not allowed. Make sure every URL matches the verified domain and protocol.
    5. Sitemap too large. Split it into smaller files and use a sitemap index.
    6. Redirected or broken URLs. Remove them and regenerate the sitemap.
    7. Blocked by robots.txt. Unblock the sitemap file and the pages inside it.

    Some sitemap fetch failures come from server or firewall issues. Our guides on common crawlability problems and the 400 Bad Request error cover these in detail.

    Advanced XML Sitemap Strategies

    Most competitors stop at the basics. These strategies help larger websites get much more value from sitemaps.

    Segment Sitemaps by Page Type

    Split your sitemap into separate files for pages, posts, products, categories, and locations. Then submit each one in Search Console.

    Now you can see indexing rates for each section separately. If only 40% of product pages are indexed, you know where to focus.

    Keep Lastmod Accurate and Automatic

    Never set every lastmod date to today. Search engines quickly learn to ignore fake dates.

    Update lastmod only when content, structured data, or important links change. Let your CMS handle this automatically.

    Pair Sitemaps With Strong Internal Linking

    A sitemap is not a replacement for internal links. Google still relies on links to judge which pages matter most.

    A page that sits in your sitemap but has no internal links is an orphan page. These rarely rank well. Our internal linking strategy guide shows how to connect every important page.

    Use Separate Sitemaps for Subdomains

    Each subdomain generally needs its own sitemap and Search Console property. Subdirectories can share your main sitemap. Our comparison of subdirectory vs subdomain for SEO explains the trade-offs.

    Manage Sitemaps at Scale

    Programmatic websites can publish thousands of pages at once. Segmented sitemaps help you track whether those pages actually get indexed. Learn more in our programmatic SEO guide.

    Protect Your Sitemap During a Migration

    Website migrations are risky moments for sitemaps. Keep your old sitemap live for a while after launch, so Google can discover the redirects faster. Then submit the new sitemap with your final URLs.

    Our website migration SEO checklist covers every step.

    XML Sitemaps for Local Businesses

    Local businesses often have location pages, service area pages, and team pages. Make sure each one appears in your sitemap.

    A separate location sitemap makes tracking easy for multi-location brands. You can quickly confirm that every city page is indexed.

    Your website and Google Business Profile should also support each other. Our Google Business Profile optimization services keep your local details consistent everywhere. For the bigger picture, read our local SEO guide.

    XML Sitemap Best Practices Checklist

    Use this quick checklist to review any sitemap.

    1. Your sitemap loads at a predictable address and returns a 200 status.
    2. It lists only canonical, indexable URLs.
    3. It contains no redirects, errors, or noindexed pages.
    4. Every URL uses HTTPS and your preferred domain version.
    5. Each file stays under 50,000 URLs and 50MB.
    6. Lastmod dates reflect real content changes.
    7. Large sites use a sitemap index and segmented files.
    8. The sitemap is submitted to Google and Bing.
    9. Its location is listed in robots.txt.
    10. You review the Search Console report every month.

    Sitemaps are just one part of technical health. See the full picture in our technical SEO checklist and our complete SEO checklist.

    When to Get Expert Help

    Basic sitemaps are easy to set up. Problems start when indexing stalls and nobody knows why.

    You may need expert help if important pages refuse to get indexed. The same goes for large ecommerce catalogs, multilingual sites, or upcoming migrations.

    At 4P Wisdom, sitemap audits are part of our technical SEO services. We find indexing gaps, clean up your sitemaps, and track the results. You can measure the impact with the SEO KPIs that matter most.

    Final Thoughts

    An XML sitemap is one of the simplest technical SEO wins available. It costs nothing and takes minutes to set up.

    It will not fix weak content or replace internal links. But it helps search engines find your best pages faster. It also gives you clear data on what Google indexes and ignores.

    Create your sitemap, keep it clean, and submit it everywhere. Then check it every month as your site grows.

    Want a professional review of your sitemap and indexing health? Contact 4P Wisdom today.

    Frequently Asked Questions

    1. Where can I find my website’s XML sitemap?

    Try yourdomain.com/sitemap.xml first. If nothing loads, check your robots.txt file for a sitemap line. Your CMS or SEO plugin settings will also show the exact location.

    2. Does an XML sitemap improve rankings?

    Not directly. A sitemap helps search engines discover and crawl your pages faster. Rankings still depend on content quality, relevance, links, and user experience.

    3. How often should I update my XML sitemap?

    Update it whenever you add, remove, or significantly change pages. Most CMS platforms and plugins do this automatically. You only need to resubmit after major structural changes.

    4. Why are my sitemap pages not getting indexed?

    Submitting a sitemap does not guarantee indexing. Common causes include thin content, duplicate pages, and weak internal linking. Check the Page Indexing report filtered by submitted pages to find the reason.

    5. Can I have more than one sitemap?

    Yes. Large sites often use several sitemaps organized by page type. Combine them with a sitemap index file, then submit that single index.

    6. What is the difference between an XML sitemap and robots.txt?

    An XML sitemap tells search engines which pages you want crawled. A robots.txt file tells them which areas to avoid. They work together, and robots.txt can point crawlers to your sitemap.

    Anchor text map for your upcoming blogs:

    1. JavaScript rendering for SEO → https://4pwisdom.com/blog/javascript-rendering/
    2. robots.txt guide → https://4pwisdom.com/blog/robots-txt/
    3. common crawlability problems → https://4pwisdom.com/blog/crawlability-problems/
    4. 400 Bad Request error → https://4pwisdom.com/blog/400-bad-request/
    5. subdirectory vs subdomain for SEO → https://4pwisdom.com/blog/subdirectory-vs-subdomain/
    6. programmatic SEO guide → https://4pwisdom.com/blog/programmatic-seo/
    7. website migration SEO checklist → https://4pwisdom.com/blog/website-migration-seo-checklist/
    8. technical SEO checklist (pillar backlink) → https://4pwisdom.com/blog/technical-seo-checklist/
  • Technical SEO Checklist 2026 │30+ Essential SEO Tasks

    Technical SEO Checklist 2026 │30+ Essential SEO Tasks

    Great content cannot rank if search engines cannot reach it. That is the hard truth behind technical SEO.

    You can write the best page in your industry. But if Googlebot cannot crawl it, it will never appear in search. If AI systems cannot read it, they will never cite it.

    Technical SEO fixes that problem. It makes your website easy to find, easy to understand, and easy to trust.

    This technical SEO checklist covers 35 essential tasks for 2026. Each one includes why it matters, how to check it, and how to fix it. We also rank every task by priority, so you know where to start.

    The SEO team at 4P Wisdom uses this same framework in client audits. Now it is yours.

     Technical SEO Checklist 2026

    What Is Technical SEO?

    Technical SEO is the process of optimizing your website’s infrastructure for search engines. It helps crawlers discover, render, index, and understand your pages.

    It focuses on what happens behind the content. Think site speed, crawlability, indexing rules, security, and site structure.

    SEO usually splits into four areas. On-page SEO covers content and keywords. Off-page SEO covers backlinks and brand mentions. Local SEO covers map and location visibility. Technical SEO supports all three.

    Picture your website as a store. Content is the product on the shelves. Technical SEO is the building, the lights, and the open front door. Without it, nobody gets inside.

    Why Technical SEO Matters More in 2026

    Search now runs on two systems at once.

    The first is traditional search, led by Google and Bing. The second is AI search, including Google AI Overviews, AI Mode, ChatGPT, Gemini, and Perplexity.

    Both systems depend on the same foundation. They need pages they can crawl, render, and trust. A technical problem used to cost you rankings. Today, it can make you invisible across search and AI answers.

    Google has also expanded its reporting for this new world. Search Console now includes AI visibility reports and multimodal search reporting. Technical health now shows up in more places than ever.

    How to Use This Technical SEO Checklist

    Not every task carries the same weight. So we labeled each one with a priority level.

    Critical tasks can block crawling or indexing. Fix these first, because nothing else works without them.

    High tasks affect rankings, user experience, or crawl efficiency. Tackle these next.

    Growth tasks help you scale, compete, and win in AI search. Handle these once your foundation is solid.

    Small business websites may finish this list in a few days. Large ecommerce or enterprise sites may need several weeks. Work through it phase by phase.

    Tools You Need Before You Start

    You do not need expensive software to begin. Many of the best technical SEO tools are free.

    1. Google Search Console shows indexing, performance, and Core Web Vitals data from Google.
    2. Bing Webmaster Tools shows how Bing crawls your site. Bing data also feeds several AI search tools.
    3. Google Analytics 4 tracks traffic, engagement, and conversions.
    4. PageSpeed Insights tests speed using lab data and real user data.
    5. Screaming Frog SEO Spider crawls your site like a search engine. The free version covers 500 URLs.
    6. Semrush, Ahrefs, or Sitebulb offer deeper audits and scheduled crawls.
    7. Chrome DevTools and Lighthouse help you debug rendering and performance issues.

    Phase 1: Setup and Baseline

    Task 1: Verify Google Search Console and Bing Webmaster Tools (Critical)

    These tools are your direct line to search engines. They reveal errors you cannot see from the outside.

    Verify your site in Google Search Console using a domain property. This captures every subdomain and protocol in one view. Then import the same site into Bing Webmaster Tools.

    Check the Manual Actions and Security Issues reports right away. A penalty or hacked page changes your entire plan.

    Task 2: Set Up Analytics and Record Your Baseline (Critical)

    You cannot prove improvement without a starting point. Before you change anything, record your current numbers.

    Note your indexed pages, organic clicks, impressions, Core Web Vitals scores, and conversions. Save a screenshot or export for each one.

    Our guide to SEO KPIs for organic and AI search growth explains which numbers matter most.

    Task 3: Run a Full Site Crawl (Critical)

    A crawler shows your website the way Googlebot sees it. It reveals broken links, redirects, missing tags, and duplicate pages in minutes.

    Crawl your full domain with Screaming Frog, Semrush Site Audit, or Ahrefs Site Audit. Enable JavaScript rendering for modern websites. Then compare the crawl against your sitemap and Search Console data.

    Pages that appear in one source but not another often hide your biggest problems.

    Phase 2: Crawlability

    Crawlability is a search engine’s ability to access and move through your pages. If crawlers cannot reach a page, it cannot rank. Our deep dive on common crawlability problems covers each issue in more detail.

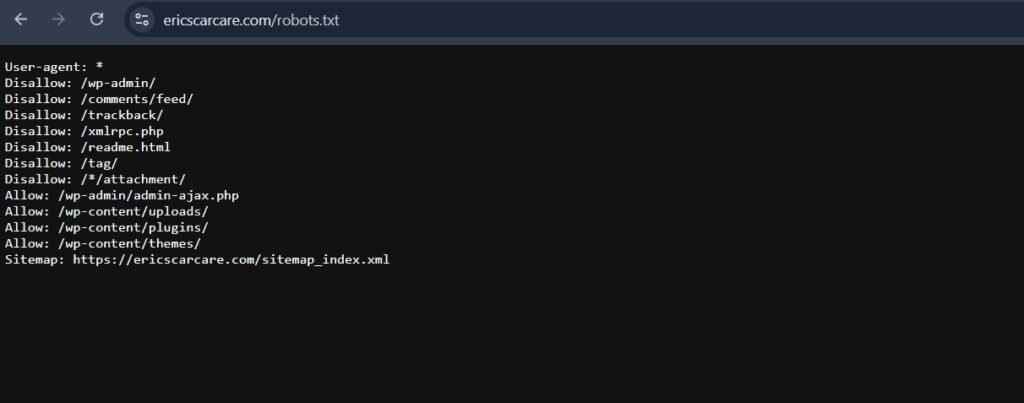
    Task 4: Audit Your Robots.txt File (Critical)

    Your robots.txt file tells crawlers which areas they may visit. It lives at yourdomain.com/robots.txt.

    One wrong line can block your entire website. This happens more often than you think, especially after a redesign.

    Check that important folders, CSS files, and JavaScript files are not blocked. Block only low-value areas like admin pages, cart pages, and internal search results.

    Remember one key rule: robots.txt controls crawling, not indexing. A blocked page can still appear in search if other sites link to it. Use a noindex tag instead when you want a page removed.

    Google also stopped supporting noindex rules inside robots.txt in 2019. Many websites still rely on them by mistake.

    Use the robots.txt report in Search Console to spot fetch errors. Google retired its old robots.txt Tester in 2023. Our robots.txt guide walks you through safe setups. Google’s robots.txt documentation is also worth bookmarking.

    Task 5: Create and Submit a Clean XML Sitemap (Critical)

    An XML sitemap lists the pages you want search engines to find. It acts like a map of your most important content.

    Include only indexable pages that return a 200 status code. Remove redirected URLs, noindex pages, and broken links. A messy sitemap sends mixed signals and wastes crawler attention.

    Each sitemap file can hold up to 50,000 URLs or 50MB uncompressed. Larger sites should split sitemaps by type, such as blog, products, and locations.

    Google ignores the priority and changefreq tags. It does use the lastmod date when it stays accurate. Update lastmod only when content meaningfully changes.

    Submit your sitemap in Search Console and Bing Webmaster Tools. Add its location to robots.txt as well. 

    Task 6: Fix Crawl Errors and Status Code Problems (Critical)

    Status codes tell crawlers what happened when they requested a page. Errors waste crawl resources and frustrate visitors.

    Watch for these common problems:

    1. 404 errors on pages that still receive links or traffic.
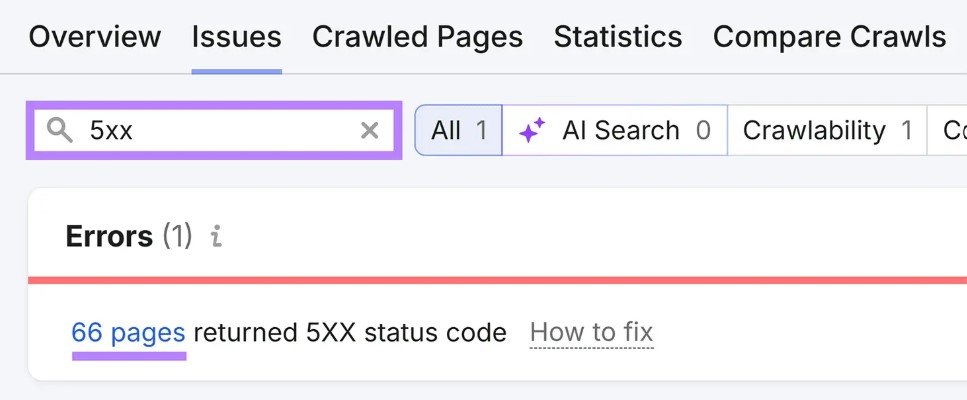
    2. 5xx server errors that signal hosting or code problems.
    3. Soft 404s, where empty pages return a 200 code.
    4. 400 errors caused by malformed URLs, bad cookies, or oversized headers.

    Restore valuable deleted pages, or redirect them to the closest relevant page. Fix server errors with your developer or hosting provider.

    Task 7: Fix Redirect Chains and Loops (High)

    A redirect chain sends users through several hops before the final page. A redirect loop sends them in circles forever.

    Both slow down pages and weaken link signals. Googlebot follows only up to ten redirect hops before giving up.

    Update internal links to point straight to the final URL. Collapse chains into a single redirect. Use the right redirect type for each situation.

    Not sure which redirect to use? Read our guide on the difference between 301 and 302 redirects.

    Task 8: Optimize Crawl Budget on Large Websites (Growth)

    Crawl budget is how many URLs Googlebot will crawl on your site in a given time. Most small websites never need to worry about it.

    Google says it matters mainly for sites with around one million pages. It also matters for sites with 10,000 or more pages that change daily.

    For larger sites, analyze server log files to see where Googlebot spends its time. Block crawl traps like endless filter combinations and calendar pages. Return 304 status codes for unchanged pages when possible.

    Learn more in our guides on what crawl budget is and why Google recommends 304 status codes.

    Task 9: Check JavaScript Rendering (High)

    Many modern websites load content with JavaScript frameworks like React, Vue, or Angular. Googlebot can render JavaScript, but it takes extra time and resources.

    Many AI crawlers cannot render JavaScript at all. If your key content loads only through scripts, AI tools may see a blank page.

    Use URL Inspection in Search Console to view the rendered HTML. Compare it with your page source. Missing text, links, or schema signal a rendering problem.

    Phase 3: Indexability

    Crawling means search engines can reach a page. Indexing means they choose to store it. Your goal is simple: index your valuable pages and exclude the rest.

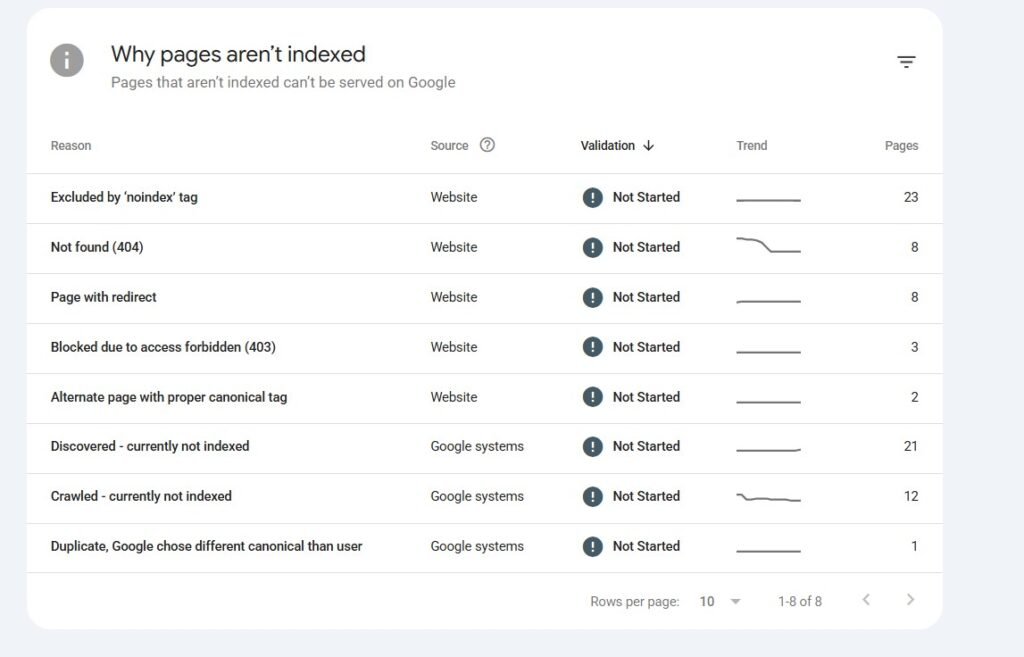
    Task 10: Review the Page Indexing Report (Critical)

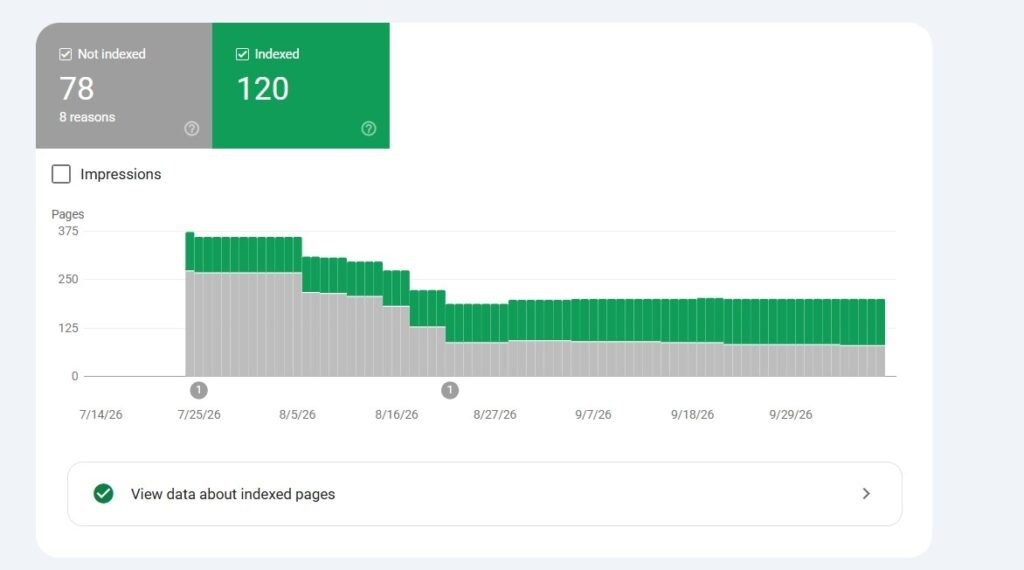
    Open the Pages report in Google Search Console. It shows indexed pages and the reasons other pages are excluded.

    Pay close attention to these statuses:

    1. Crawled, currently not indexed often signals thin or low-value content.
    2. Discovered, currently not indexed often signals crawl capacity or quality issues.
    3. Duplicate without user-selected canonical means Google picked a different version.
    4. Excluded by noindex tag may reveal accidental noindex rules.

    Fix the pages that matter to your business first. Then check Bing’s Site Explorer, because its index often differs from Google’s.

    Task 11: Use Noindex Tags With Care (Critical)

    A noindex tag tells search engines to keep a page out of results. It is useful, but dangerous when misused.

    Use noindex on thank-you pages, internal search results, staging pages, and thin tag archives. Never use it on pages you want to rank.

    A common disaster happens after launch. Developers forget to remove the noindex setting from the staging site. Check this after every redesign or migration.

    Task 12: Set Canonical Tags Correctly (High)

    A canonical tag tells Google which version of a page is the main one. It consolidates ranking signals when similar pages exist.

    Every indexable page should include a self-referencing canonical. Duplicate or near-duplicate pages should point to the preferred version.

    Keep your canonicals consistent with redirects, sitemaps, and internal links. Conflicting signals often lead Google to ignore your choice. Our full guide explains what a canonical tag is and how to use it.

    Task 13: Consolidate One Preferred Domain Version (Critical)

    Your website might load at four different addresses. These include HTTP, HTTPS, www, and non-www versions.

    Search engines may treat each version as a separate website. That splits your authority and creates duplicate content.

    Choose one HTTPS version as your main domain. Then redirect every other version to it with a permanent 301 redirect. Also keep trailing slashes consistent across your URLs.

    Task 14: Fix Duplicate, Thin, and Parameter Content (High)

    Duplicate content confuses search engines about which page to rank. Thin content wastes crawl attention and drags down site quality.

    Look for these common sources:

    1. URL parameters from filters, sorting, and tracking tags.
    2. Printer-friendly or session ID page versions.
    3. Near-identical location or product pages.
    4. Auto-generated tag and category archives.

    Google retired its URL Parameters tool in 2022. Today, you control parameters through canonicals, internal links, and robots.txt rules.

    Merge, improve, or remove thin pages. For pages with little value, a noindex tag or a redirect works well.

    Phase 4: Site Architecture

    Site architecture is how your pages connect and relate. A clear structure helps users, crawlers, and AI systems understand your expertise.

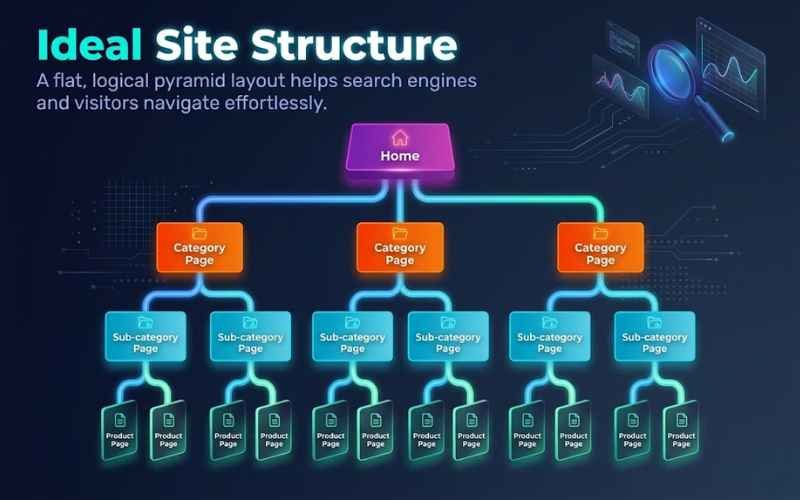
    Task 15: Build a Flat, Logical Site Structure (High)

    The ideal structure looks like a pyramid. Your homepage sits on top, followed by categories, subcategories, and individual pages.

    Keep important pages within three clicks of the homepage. Deeply buried pages get crawled less often and earn less authority.

    Group related content into topic clusters. A pillar page covers the broad topic, and supporting posts cover the details. This very checklist works as the pillar for our technical SEO cluster.

    Task 16: Use Clean, Descriptive URLs (High)

    A good URL tells users and search engines what the page covers. Short, readable URLs also earn more trust in search results.

    Use lowercase letters and real words. Separate words with hyphens rather than underscores. Avoid random numbers, session IDs, and long parameter strings.

    Keep your URL folders aligned with your site structure. For example, service pages should sit inside a services folder.

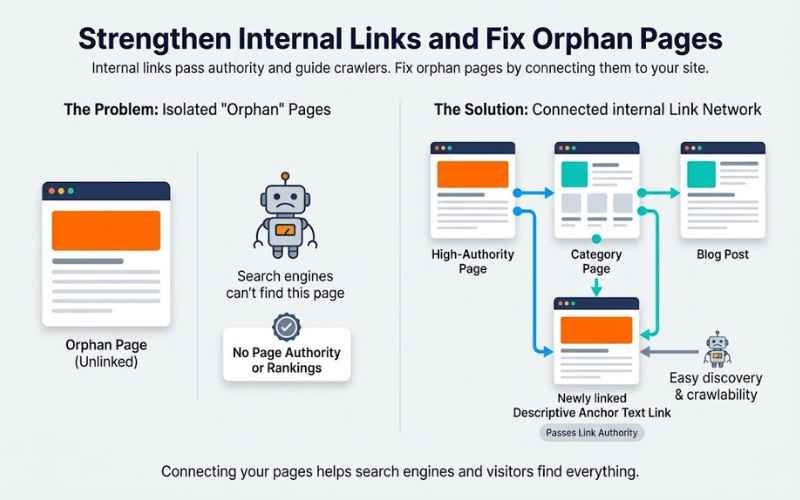
    Task 17: Strengthen Internal Links and Fix Orphan Pages (High)

    Internal links guide crawlers through your site and pass authority between pages. They also help visitors find related answers.

    An orphan page has no internal links pointing to it. Search engines struggle to find these pages, so they rarely rank.

    Use descriptive anchor text instead of “click here.” Link from strong pages to important pages that need a boost. Our internal linking strategy guide covers every step in detail.

    Task 18: Add Breadcrumb Navigation (Growth)

    Breadcrumbs show users where they are on your site. They look like this: Home, then Blog, then Technical SEO Checklist.

    They improve navigation and reinforce your site hierarchy. When marked up with structured data, Google can show them in search results.

    Task 19: Choose Subdirectories or Subdomains Wisely (Growth)

    Where you place content affects how authority flows. A subdirectory looks like yourdomain.com/blog. A subdomain looks like blog.yourdomain.com.

    Google says it handles both. In practice, many SEOs find subdirectories consolidate authority more easily. Subdomains suit separate products, apps, or international operations.

    Phase 5: Page Experience and Performance

    Page experience covers how visitors feel when they use your site. Google’s page experience guidance confirms these signals support its ranking systems.

    Task 20: Pass Core Web Vitals (High)

    Core Web Vitals are Google’s main metrics for real user experience. You need to pass all three at the 75th percentile of visits.

    1. Largest Contentful Paint (LCP) measures loading speed. Aim for 2.5 seconds or less.
    2. Interaction to Next Paint (INP) measures responsiveness. Aim for 200 milliseconds or less.
    3. Cumulative Layout Shift (CLS) measures visual stability. Aim for 0.1 or less.

    INP replaced First Input Delay in March 2024. Many older checklists still mention the retired metric.

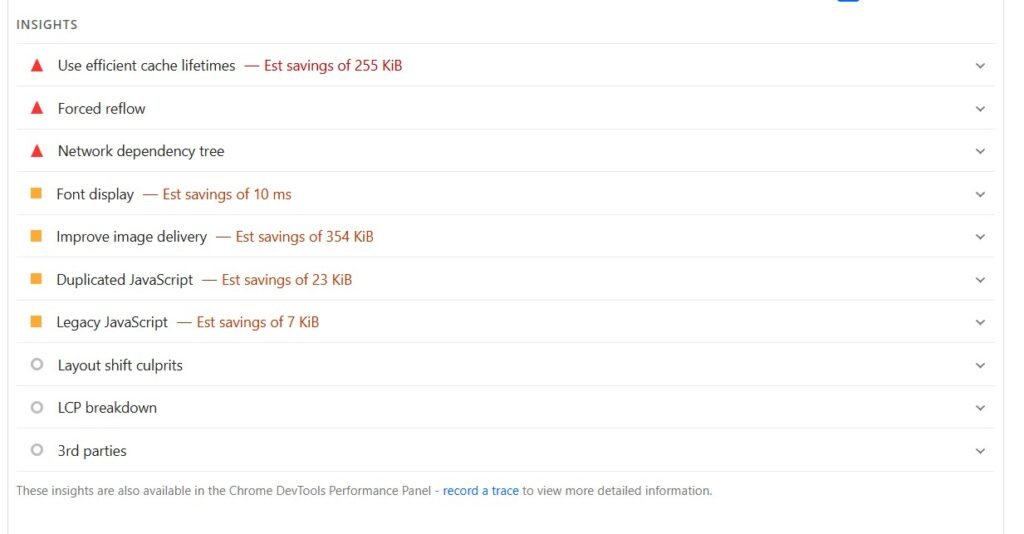
    Check the Core Web Vitals report in Search Console for field data. Then run poor URLs through PageSpeed Insights for specific fixes. 

    Task 21: Improve Server Response Time (High)

    A slow server delays everything else on the page. Time to First Byte measures how fast your server responds.

    Aim for a Time to First Byte under 800 milliseconds. Faster is always better.

    Use quality hosting rather than the cheapest plan. Add a content delivery network like Cloudflare. Enable server and browser caching. Make sure your server supports HTTP/2 or HTTP/3.

    Your website build also matters. Our comparison of static vs dynamic websites explains how each affects speed.

    Task 22: Optimize Images and Media (High)

    Images are often the heaviest files on a page. They also cause many LCP and CLS problems.

    Serve modern formats like WebP or AVIF. Compress files before uploading. Set width and height attributes to prevent layout shifts. Lazy load images below the fold, but never your main hero image.

    Write descriptive alt text for every meaningful image. It helps accessibility, image search, and multimodal AI search. Wondering if more images help?

     Read how adding more pictures improves SEO.

    Task 23: Make Your Site Mobile First (Critical)

    Google now uses mobile-first indexing for virtually every website. It mainly crawls and ranks the mobile version of your pages.

    If your mobile site hides content, Google may never see it. Keep text, images, links, and structured data identical across devices.

    Test on real phones, not just desktop emulators. Check text size, tap target spacing, and menu usability. Google retired its Mobile-Friendly Test in December 2023, so use Lighthouse instead.

    Task 24: Check Website Accessibility (High)

    Accessibility means everyone can use your site, including people with disabilities. It also helps search engines and AI agents understand your pages.

    Accessible sites use semantic HTML, clear headings, alt text, and readable color contrast. They also support keyboard navigation and screen readers.

    Follow the Web Content Accessibility Guidelines from the W3C, currently WCAG 2.2. Laws like the ADA in the United States also apply. So does the European Accessibility Act, enforced since June 2025.

    Task 25: Secure Your Site With HTTPS (Critical)

    HTTPS encrypts data between your website and its visitors. Google has used it as a ranking signal since 2014.

    Browsers also label HTTP pages as “Not Secure.” That warning destroys trust and conversions instantly.

    Install an SSL certificate, which many hosts provide for free. Redirect all HTTP pages to HTTPS. Then scan for mixed content, where secure pages still load insecure files.

    Task 26: Remove Intrusive Interstitials (High)

    Intrusive interstitials are popups that block content, especially on mobile. Google treats them as a poor user experience.

    Avoid full-screen popups that appear right after a visitor lands. Cookie notices, age checks, and login prompts are acceptable when required.

    Use small banners or delayed popups instead. They capture leads without frustrating visitors.

    Phase 6: Structured Data and Entity Signals

    Search engines now think in entities, not just keywords. An entity is a distinct person, place, brand, or thing. This phase helps machines understand exactly who you are.

    Task 27: Add and Validate Schema Markup (High)

    Schema markup is structured data that labels your content for machines. It uses the shared Schema.org vocabulary created by Google, Bing, and Yahoo.

    Schema is not a direct ranking factor. But it can make pages eligible for rich results like stars, prices, and breadcrumbs. It also clarifies your brand, authors, and services.

    Start with Organization, LocalBusiness, Article, Person, BreadcrumbList, and Product where relevant. Use JSON-LD, which Google recommends. Test every change with the Rich Results Test.

    Task 28: Build Consistent Entity Signals (Growth)

    Search engines trust businesses that look the same everywhere. Your name, address, and phone number should match across every platform.

    Check your website, Google Business Profile, social profiles, and directory listings. Even small differences can weaken your local and brand signals.

    Use sameAs links in your Organization schema to connect official profiles. Add author bio pages to support E E A T, which means Experience, Expertise, Authoritativeness, and Trustworthiness.

    Our Google Business Profile optimization services keep your local details consistent. 

    Phase 7: AI Search Readiness

    AI search tools collect web content in different ways. Some train models, and some fetch pages live to answer questions. This phase makes sure the right systems can reach you.

    Task 29: Decide Which AI Crawlers Can Access Your Site (Growth)

    AI companies use separate crawlers for different jobs. For example, GPTBot collects training data for OpenAI. OpenAI uses a different crawler to power ChatGPT search results.

    Other common crawlers include ClaudeBot, PerplexityBot, and Applebot. Google also offers a separate robots.txt token for Gemini training. Blocking that token does not remove you from Google Search.

    Decide your policy on purpose. Many businesses allow search and retrieval crawlers but block training crawlers. Then check your robots.txt, firewall, and CDN settings. Some security tools block AI bots by default.

    Check your server logs to confirm which bots actually visit.

    Task 30: Serve Key Content in Clean HTML (High)

    AI agents and many crawlers read raw HTML. They may not run scripts or click buttons to reveal text.

    Make sure your main content, prices, and policies load in the initial HTML. Avoid hiding important answers inside tabs that need JavaScript to open.

    Use semantic HTML elements like header, nav, main, article, and footer. Use one clear H1 and a logical heading order. This structure helps both screen readers and AI systems.

    For broader AI strategy, read how to rank in Google’s AI Overviews. Service businesses should also see how to win with AI search SEO.

    Task 31: Consider an llms.txt File (Growth)

    An llms.txt file is a proposed standard that guides AI tools to your best content. It sits in your root folder, like robots.txt.

    Here is the truth. Google has said it does not use llms.txt today. No major AI platform has confirmed it as a ranking or citation signal.

    So treat it as a low-cost experiment, not a priority. It takes little effort and may help some AI tools.

    Phase 8: International SEO and Scale

    Task 32: Implement Hreflang for Multilingual Sites (Growth)

    Hreflang tags tell Google which language or regional page to show each user. They prevent the wrong version from ranking in the wrong country.

    Every page in a hreflang set must reference all other versions, including itself. Missing return links are the most common mistake. Also define a default fallback page for unmatched users.

    Use correct language and country codes. Follow Google’s localized versions guide for the exact format.

    Task 33: Add Guardrails to Programmatic SEO (Growth)

    Programmatic SEO creates many pages from templates and data. Think city pages, product comparisons, or integration pages.

    Done well, it captures thousands of long-tail searches. Done badly, it creates thin, duplicate pages that hurt your whole site.

    Make sure every page offers unique, useful data. Link pages through logical hubs. Submit them in segmented sitemaps and monitor indexing closely. 

    Phase 9: Migrations and Ongoing Monitoring

    Task 34: Follow a Strict Migration Checklist (Critical)

    Website migrations cause some of the biggest traffic drops in SEO. Domain changes, redesigns, and platform moves all carry risk.

    Crawl your old site and save every URL before you start. Map each old URL to its new match. Use 301 redirects, and test them on staging first.

    After launch, update your sitemap and canonicals. Use the Change of Address tool in Search Console for domain moves. Monitor indexing and traffic daily for several weeks. Google’s site move guide is essential reading. 

    Task 35: Monitor Technical Health Continuously (High)

    Technical SEO is never one and done. Plugins update, developers push code, and content teams publish daily. Any change can break something.

    Schedule automatic weekly crawls in your audit tool. Turn on email alerts in Search Console. Watch for sudden drops in indexed pages, clicks, or Core Web Vitals.

    Use IndexNow to notify Bing and other supporting engines about updates instantly. Many CMS platforms and SEO plugins support it. Learn more at IndexNow.org.

    How Often Should You Run a Technical SEO Audit?

    The right schedule depends on your site’s size and how often it changes.

    1. Weekly: review Search Console alerts and automated crawl reports.
    2. Monthly: check indexing, Core Web Vitals, broken links, and redirects.
    3. Quarterly: run a full audit of structure, schema, and content quality.
    4. Every major change: audit before and after redesigns, migrations, and platform updates.

    Large ecommerce sites may need daily monitoring. Small local business sites can usually follow the monthly rhythm.

    How to Prioritize Your Technical SEO Fixes

    An audit can surface hundreds of issues. Trying to fix everything at once wastes time and money.

    Score each issue by impact and effort. High impact, low effort fixes come first. These are your quick wins.

    Then follow this order:

    1. Anything blocking crawling or indexing of money pages.
    2. Errors affecting high-traffic or high-converting pages.
    3. Sitewide template problems that repeat across many pages.
    4. Performance and user experience improvements.
    5. Growth tasks for AI search, scale, and international reach.

    A single template fix can repair thousands of pages at once. Always look for patterns before fixing pages one by one.

    Common Technical SEO Mistakes to Avoid in 2026

    Many websites still follow outdated advice. Avoid these common mistakes.

    1. Leaving a staging noindex tag live after launch.
    2. Blocking CSS or JavaScript files in robots.txt.
    3. Adding noindex rules inside robots.txt, which Google ignores.
    4. Relying on retired tools like the Mobile Friendly Test or URL Parameters tool.
    5. Tracking First Input Delay instead of Interaction to Next Paint.
    6. Including redirected or noindex URLs in your sitemap.
    7. Loading critical content only through JavaScript.
    8. Fixing issues on low-value pages before money pages.
    9. Migrating a website without a full redirect map.
    10. Blocking every AI crawler without understanding the trade-offs.

    Technical SEO Tips for Local Businesses

    Local businesses face unique technical challenges. Your website must support your map rankings, not just your organic rankings.

    Create a dedicated page for each location you serve. Add LocalBusiness schema with matching name, address, and phone details. Embed a Google Map on your contact page.

    Keep your site fast on mobile, since most local searches happen on phones. Make your phone number clickable and easy to find.

    Our local SEO guide explains the full strategy. You can also learn how Google determines relevance, distance, and prominence.

    When Should You Hire a Technical SEO Expert?

    Some technical tasks are simple. Others can quietly damage your traffic if done wrong.

    Consider expert help in these situations:

    1. Your traffic dropped suddenly without a clear reason.
    2. You are planning a redesign, domain change, or platform migration.
    3. Your site runs on a JavaScript framework.
    4. You manage thousands of pages or multiple locations.
    5. Important pages refuse to get indexed.

    At 4P Wisdom, technical audits are a core part of our SEO services. We find the issues, rank them by business impact, and fix them with your team.

    Final Thoughts

    Technical SEO is the foundation every other strategy stands on. Without it, great content and strong backlinks cannot reach their full potential.

    Start with the critical tasks. Make sure search engines can crawl, render, and index your key pages. Then improve speed, structure, and entity signals. Finally, prepare your site for AI search and future growth.

    Bookmark this checklist and revisit it every quarter. Pair it with our complete SEO checklist for full coverage.

    Ready for a professional technical audit? Contact 4P Wisdom and let our team find what is holding your site back.

    Frequently Asked Questions

    1. What is included in a technical SEO checklist?

    A technical SEO checklist covers crawlability, indexability, site architecture, speed, mobile usability, and security. It also includes structured data, accessibility, and AI crawler access. Together, these tasks help search engines find and trust your pages.

    2. How long does a technical SEO audit take?

    A small website audit usually takes a few days. A large ecommerce or enterprise audit can take several weeks. Fixing the issues may take longer, depending on developer resources.

    3. Can I do technical SEO myself without a developer?

    Yes, for many tasks. You can manage sitemaps, robots.txt, redirects, and schema with WordPress plugins like Yoast SEO or Rank Math. See our list of the best WordPress SEO plugins. JavaScript rendering, server speed, and migrations usually need a developer.

    4. Is technical SEO more important than content?

    Neither works well alone. Technical SEO makes your content reachable and understandable. Content gives search engines and users a reason to care. The strongest websites invest in both.

    5. Does technical SEO affect AI search visibility?

    Yes. AI tools rely on crawlable, readable pages to find and cite content. Blocked crawlers, JavaScript-only content, and slow pages can keep you out of AI answers. Strong technical SEO improves visibility in both search and AI platforms.

    6. How often should I update my technical SEO?

    Monitor key reports weekly and run a full audit every quarter. Always audit before and after redesigns, migrations, or major plugin updates. Search engines change constantly, so ongoing checks protect your rankings.